
This tutorial is for those who would like to setup their NCKCN email account on a Windows based operating system using an email client program on their desktop/laptop using NCKCN’s standard email settings. This articles does not include how to setup your NCKCN email account using NCKCN’s SMTP Mobile email settings.
DISCLAIMER: NCKCN will not be held liable nor will we be held responsible for any data loss or damage that may occur on your device. You are solely responsible for your actions. This article is merely a guide on how to setup your NCKCN email account using an email client on a Desktop/Laptop.
==========
Please Note: We apologize in advance if you do not see the email client you use listed below. If you would like us to write up a tutorial for a specific email client or if you have written up a tutorial on an email client that isn’t listed below and would like to share it with the NCKCN community, feel free to send us an email request to: support@nckcn.com — We will do our best to keep this article updated. Thanks in advance!
If you encounter any issues/errors when setting up your email account on any email client, feel free to give our Tech Support a call at: 1-877-841-6500 or you may need to contact the developers of the email client you are trying to use (example: outlook 2016’s development team is Microsoft, Thunderbird’s development team is Mozilla, etc…)
This article applies to the following email clients — Jump to:
- Outlook 2016 — (NOTE: Outlook 2016 is very similar to how one would create a new email account on Outlook 2013)
- Thunderbird
- Default “Mail” app that comes pre-installed with Windows 10
==========
Outlook 2016
First and foremost, ensure that Outlook 2016 is activated/licensed. If it is not, you will need to obtain/purchase a license from Microsoft to activate this product (either as a stand-alone product or part of the Office 2016 suite).
This tutorial covers a licensed version of Outlook 2016 – If your product is not licensed, some features of this product may not work and/or setting up your NCKCN email account using this product may not work. We have not tested setting up a NCKCN email account with an un-licensed product so we cannot confirm whether or not a licensed version of this product is needed or not, we are simply letting you know that with an un-licensed version, things may not work properly.
To see if your product is activated and/or to activate this product, open Outlook 2016 and click on “File” in the upper left-hand corner. Then select “Office Account“. Under “Product Information“, if this product is activated, it will say “Product Activated“. If you do not see this, you will need to obtain/purchase a license from Microsoft for this product and/or if you have a license, you will need to type the license key in by clicking “Change Product Key“.
Now that Outlook 2016 is activated on your desktop/laptop, let’s setup your NCKCN email account using this email client.
- Open Outlook 2016
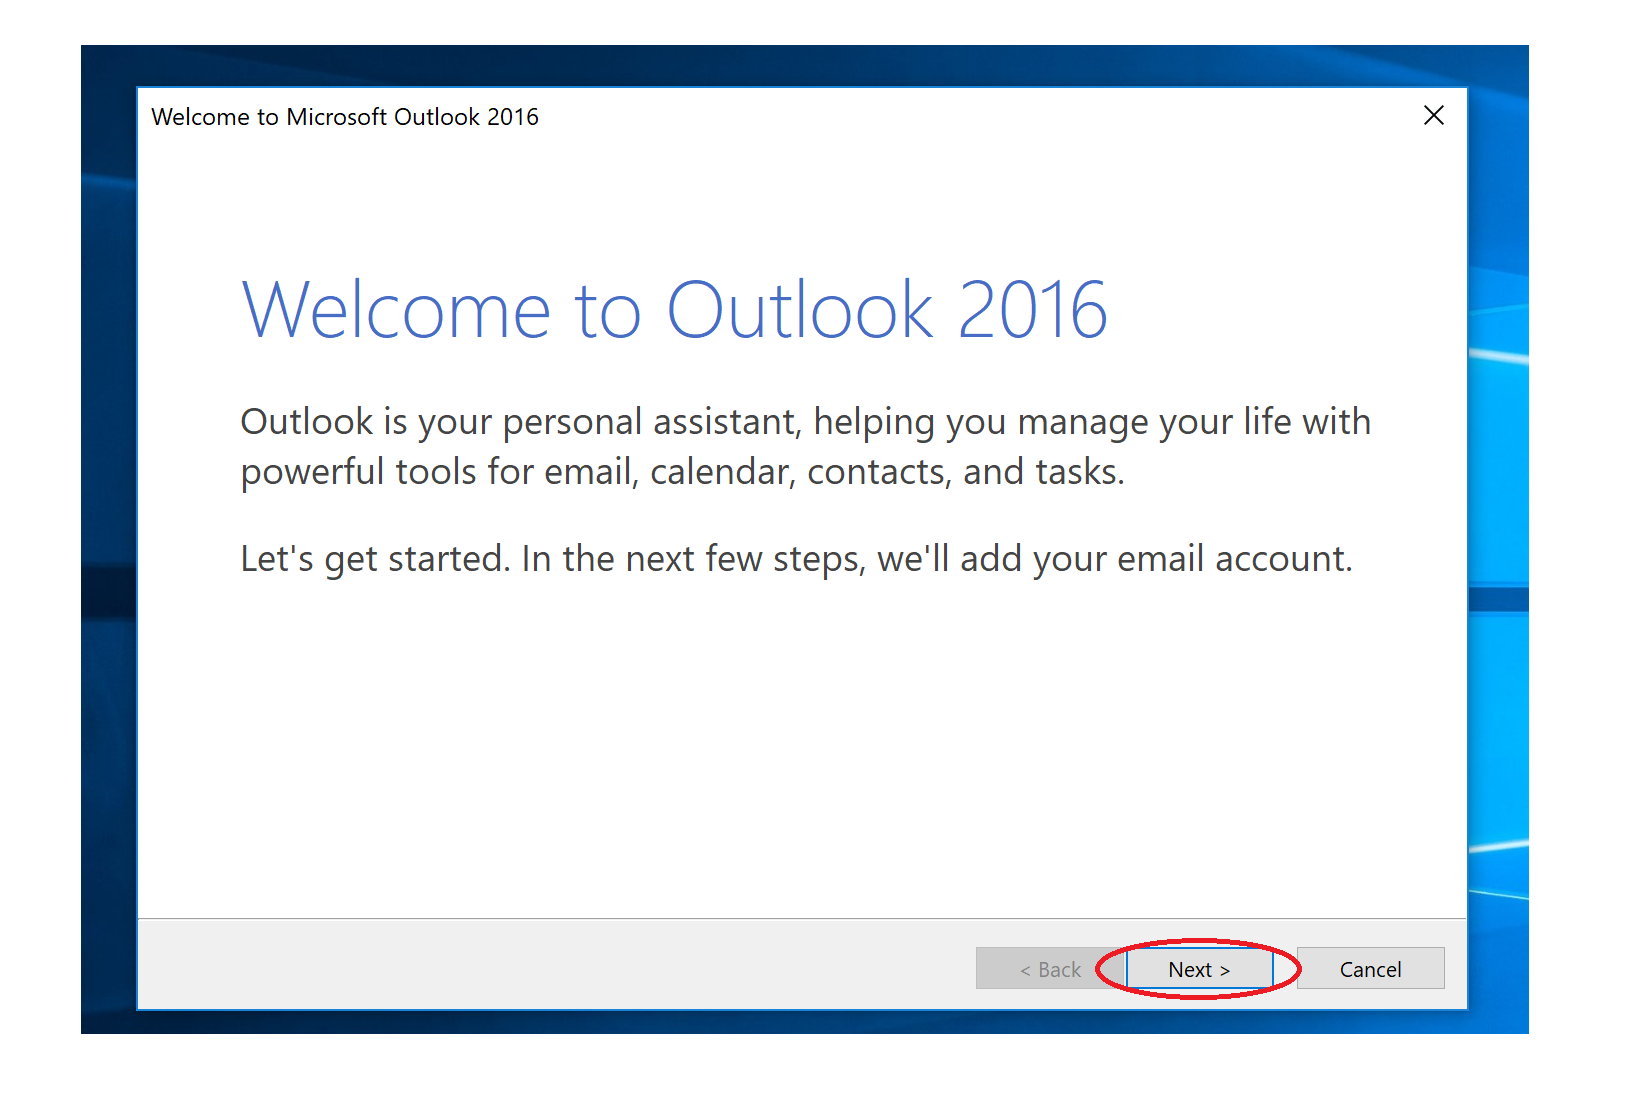
- If this is the first time using Outlook 2016, you will be prompted with a “Welcome” message. Click “Next“. If this is not your first time using this email client, you will need to click on “File” and then select “Add Account” which is under “Account Information“. If this is not your first time using this email client and you have clicked “Add Account”, please skip to: Auto Account Setup below.
- Add an Email Account — Do you want to set up Outlook to connect to an email account? Select “Yes” if not selected and then click “Next“.

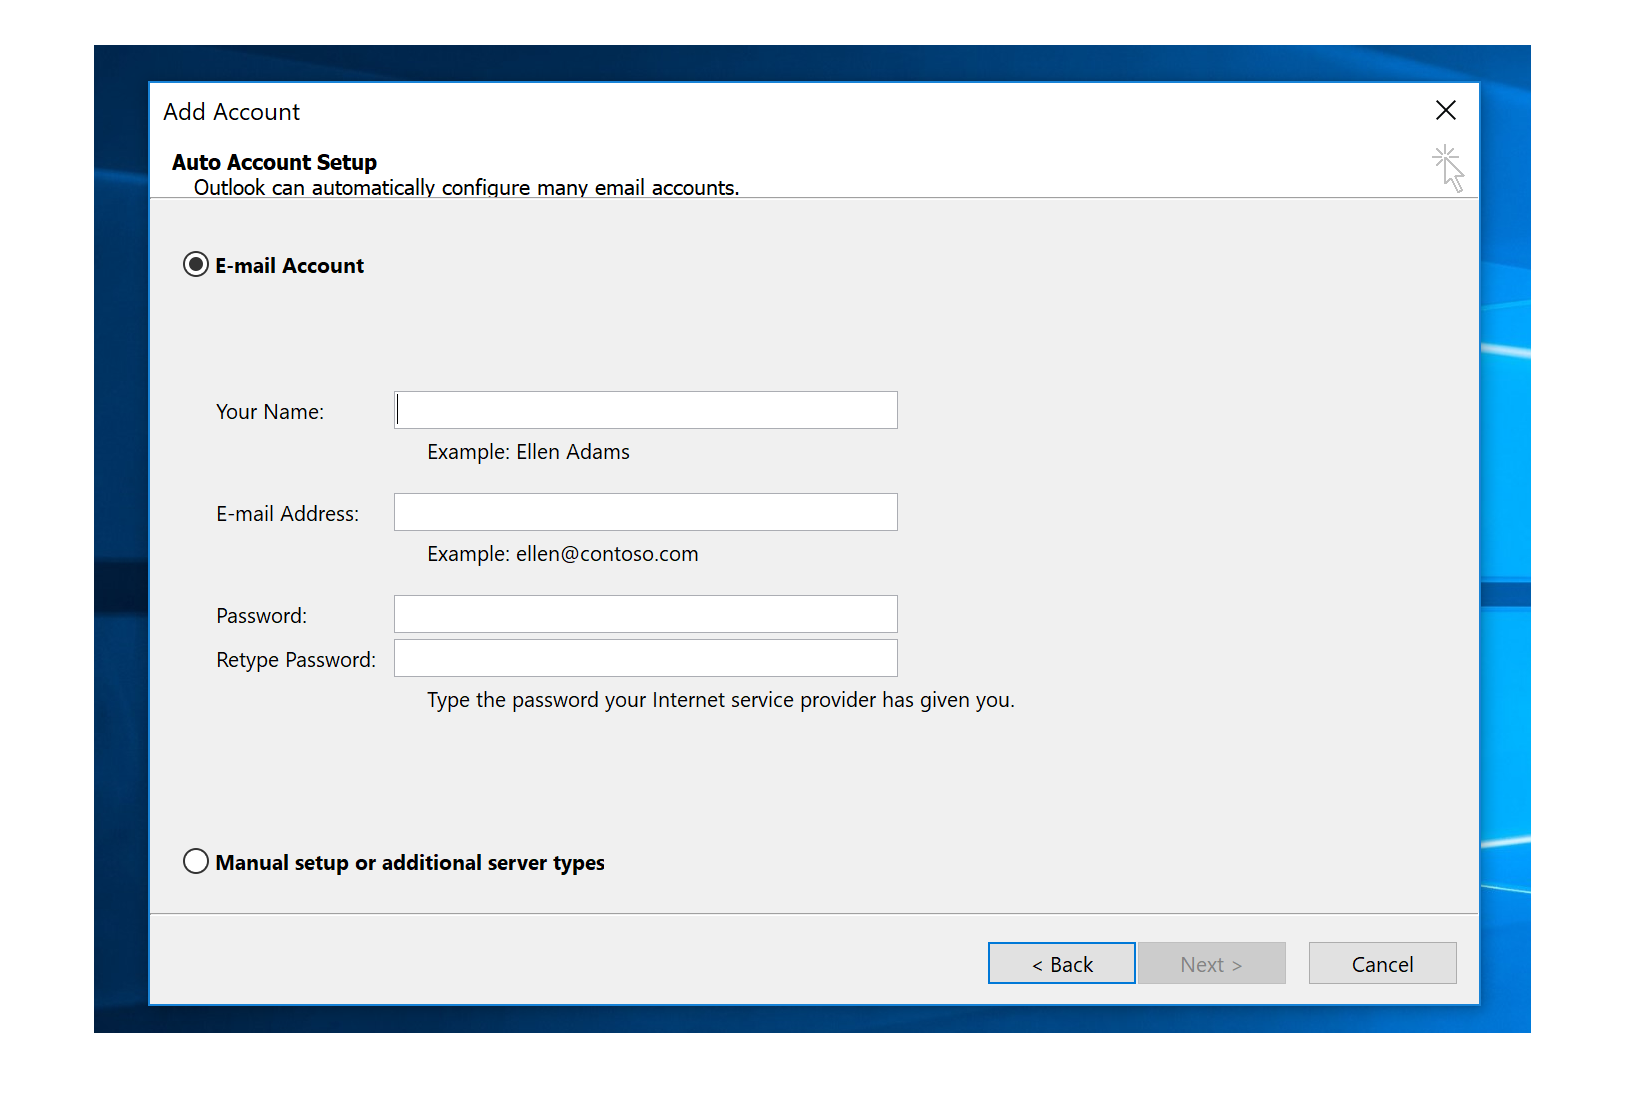
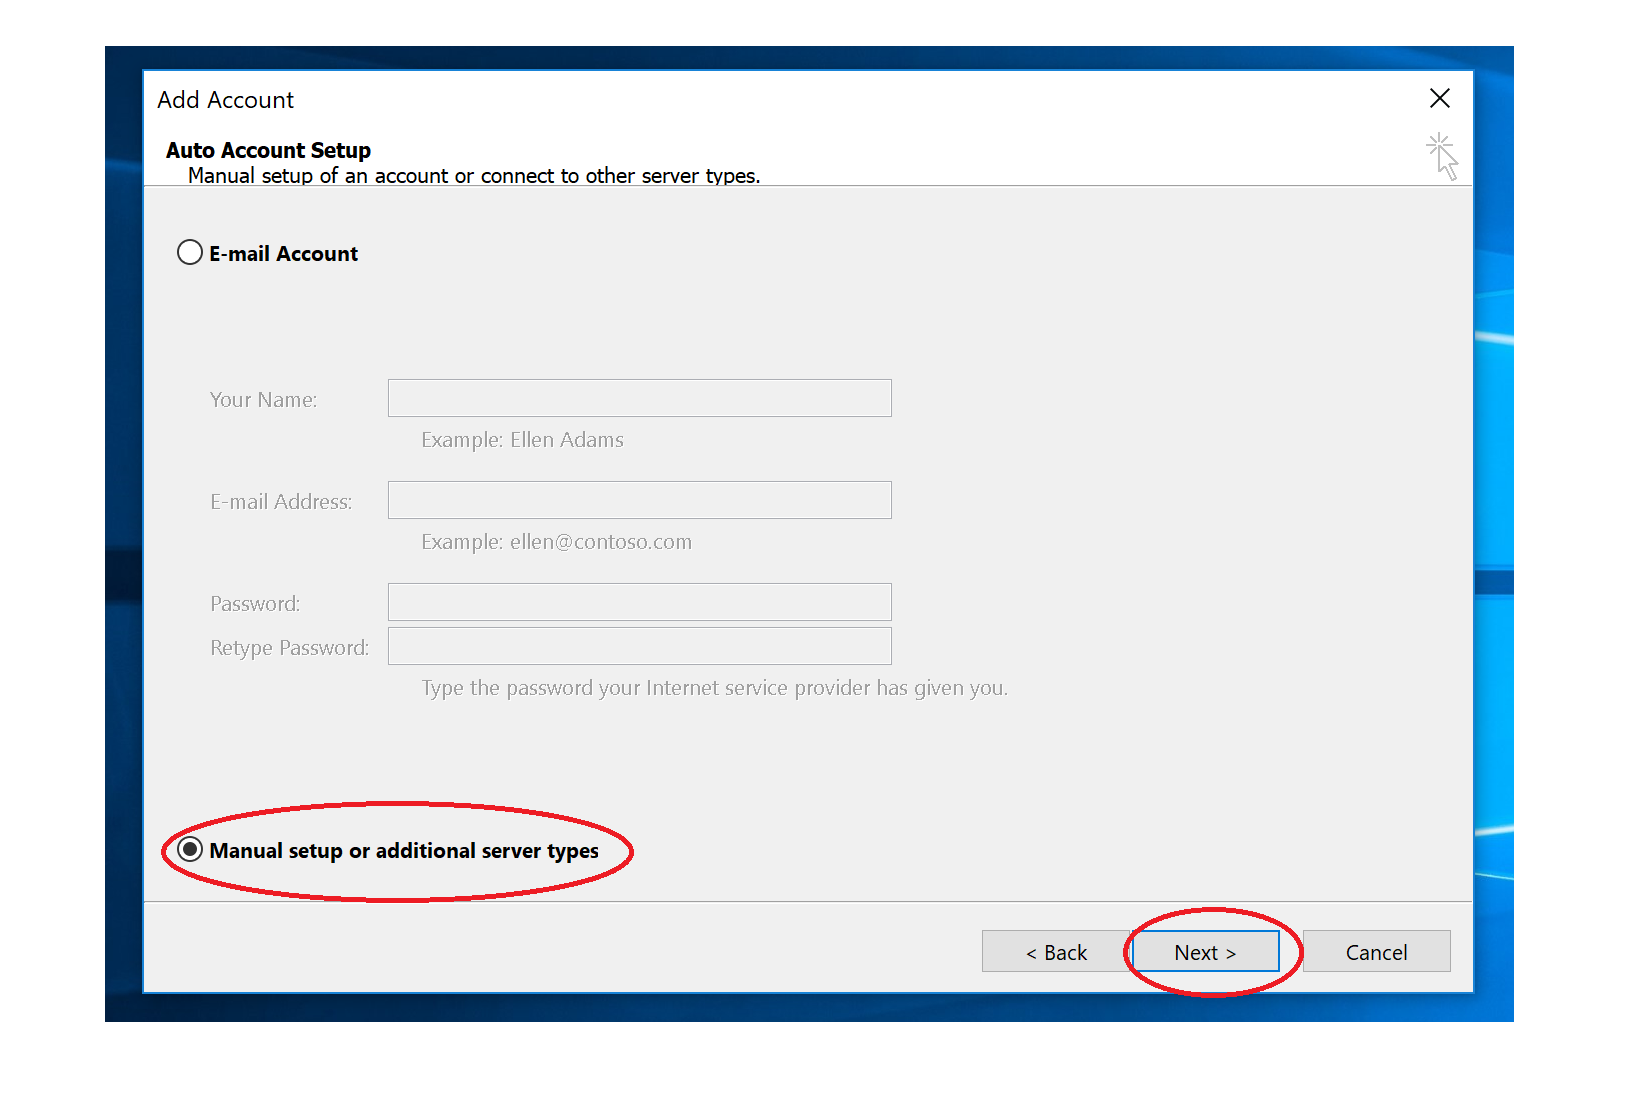
- Auto Account Setup — “E-mail Account” by default is selected, however, you will want to select “Manual setup or additional server types” and then click “Next“.
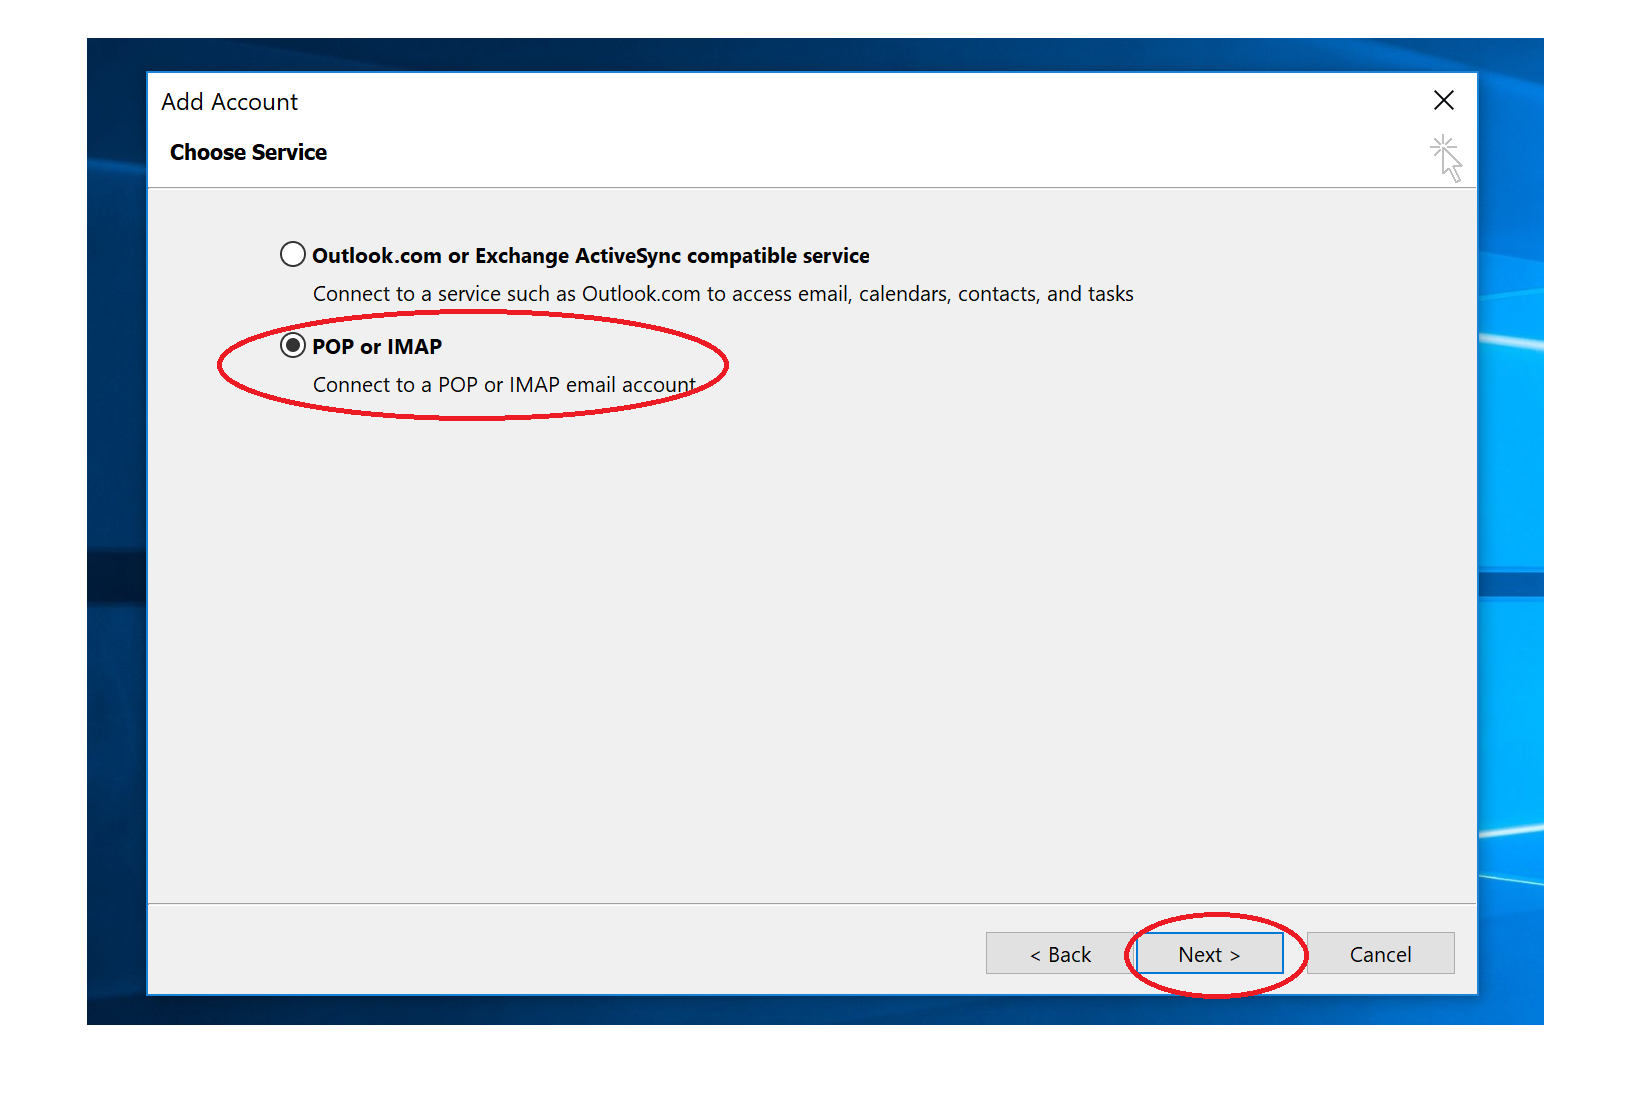
- Choose Service — Select “POP or IMAP” and then click “Next“.
- POP and IMAP Account Settings
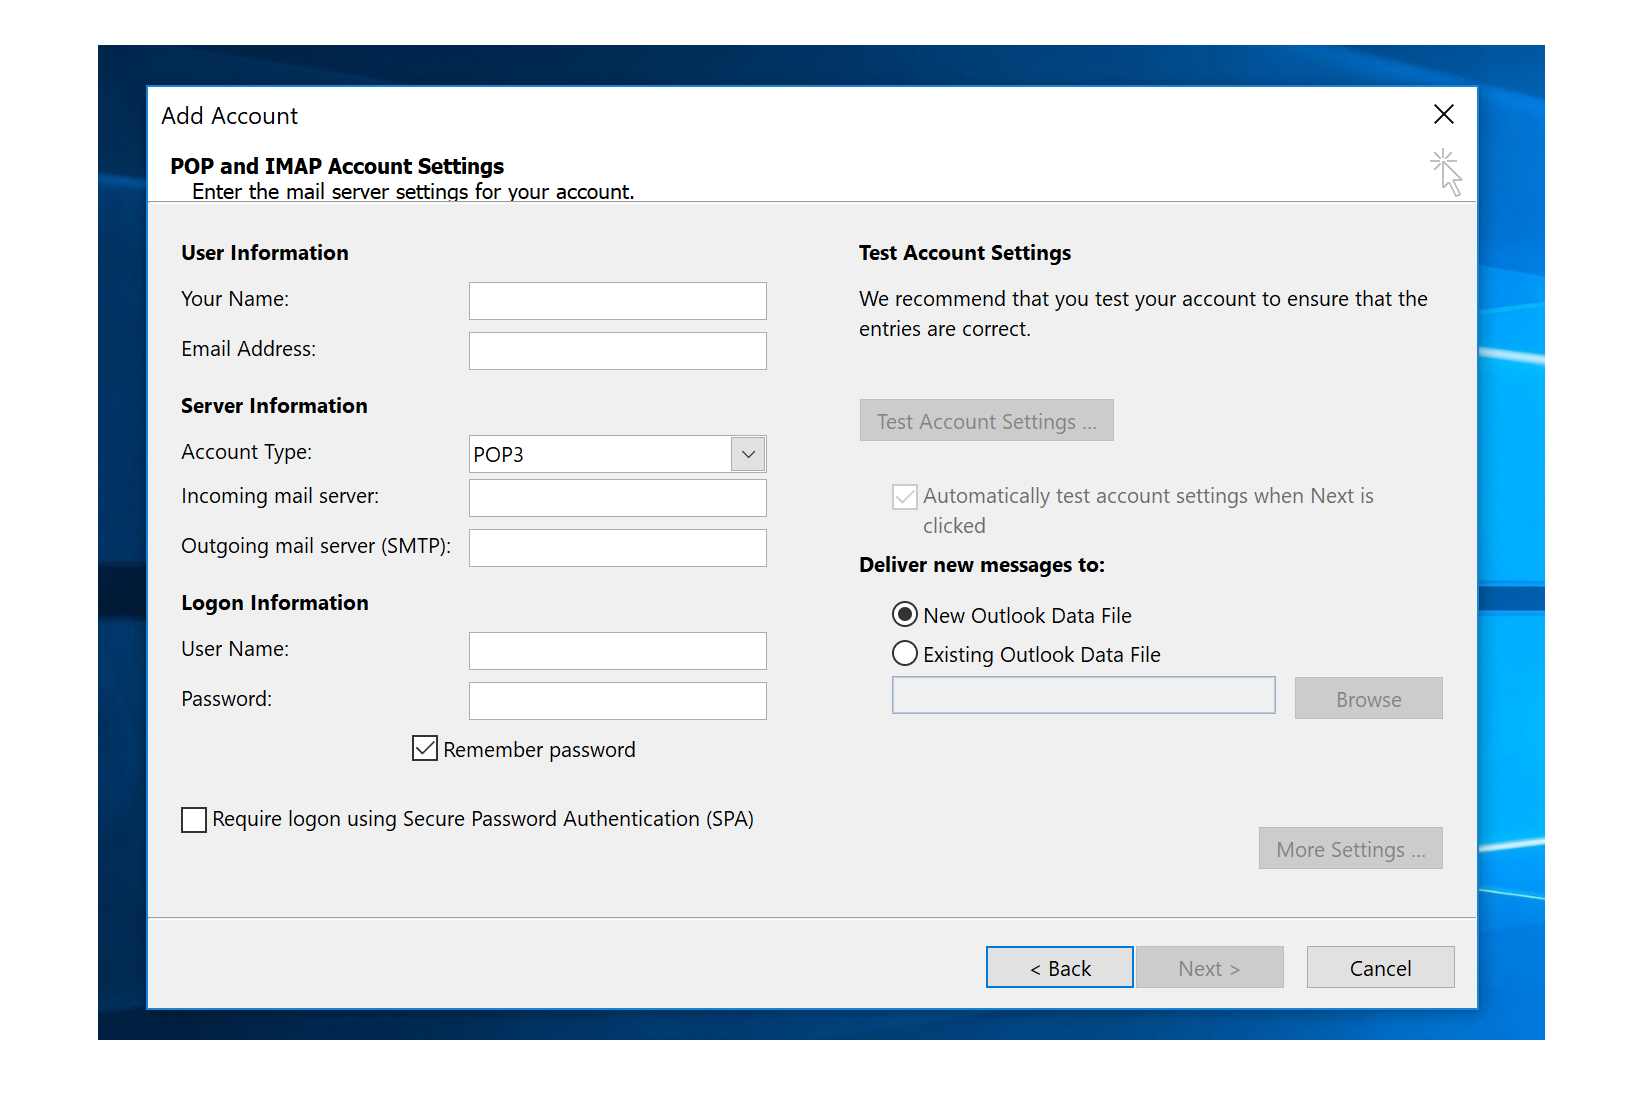
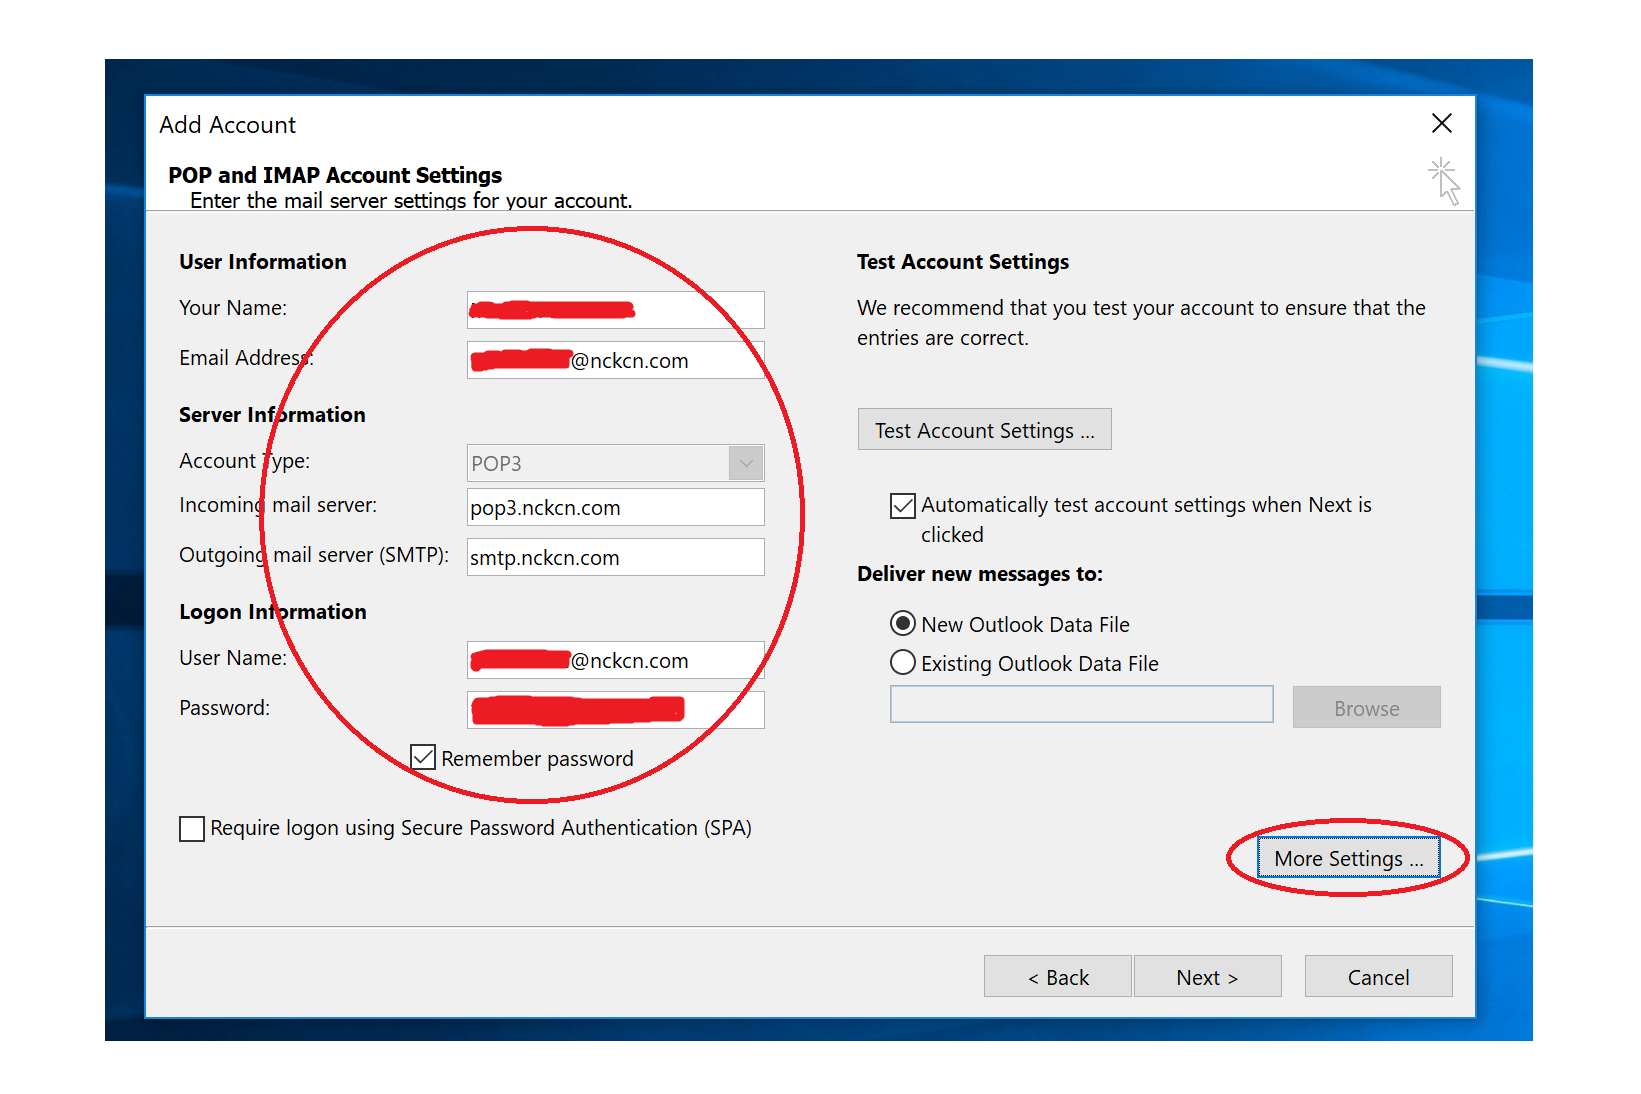
- POP and IMAP Account Settings continued — Fill in the information as shown below but with your own information. Once you have typed in the following information, click “More Settings …“.
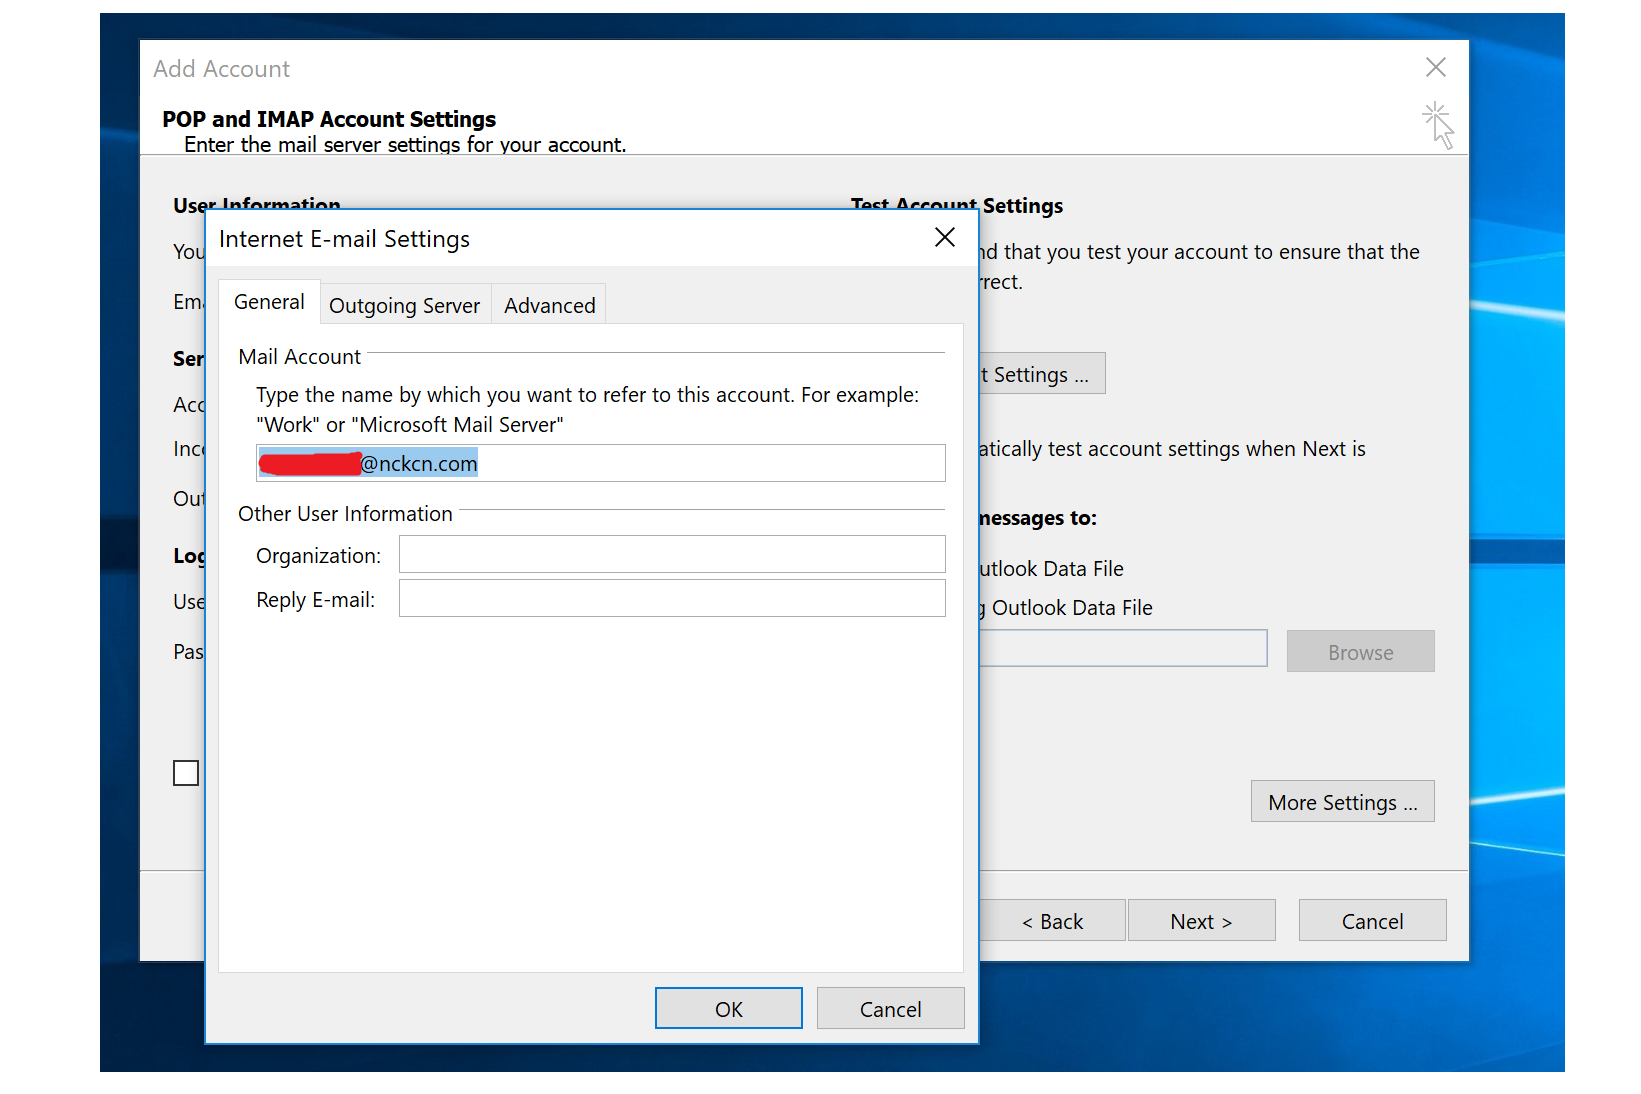
- Internet E-mail Settings –> General tab — By default, Outlook will auto-generate the email account name under “Mail Account” as well as leaving the “Other User Information” fields empty. You can either leave as is, or change to suit your needs. Next, click on the “Outgoing Server” tab.
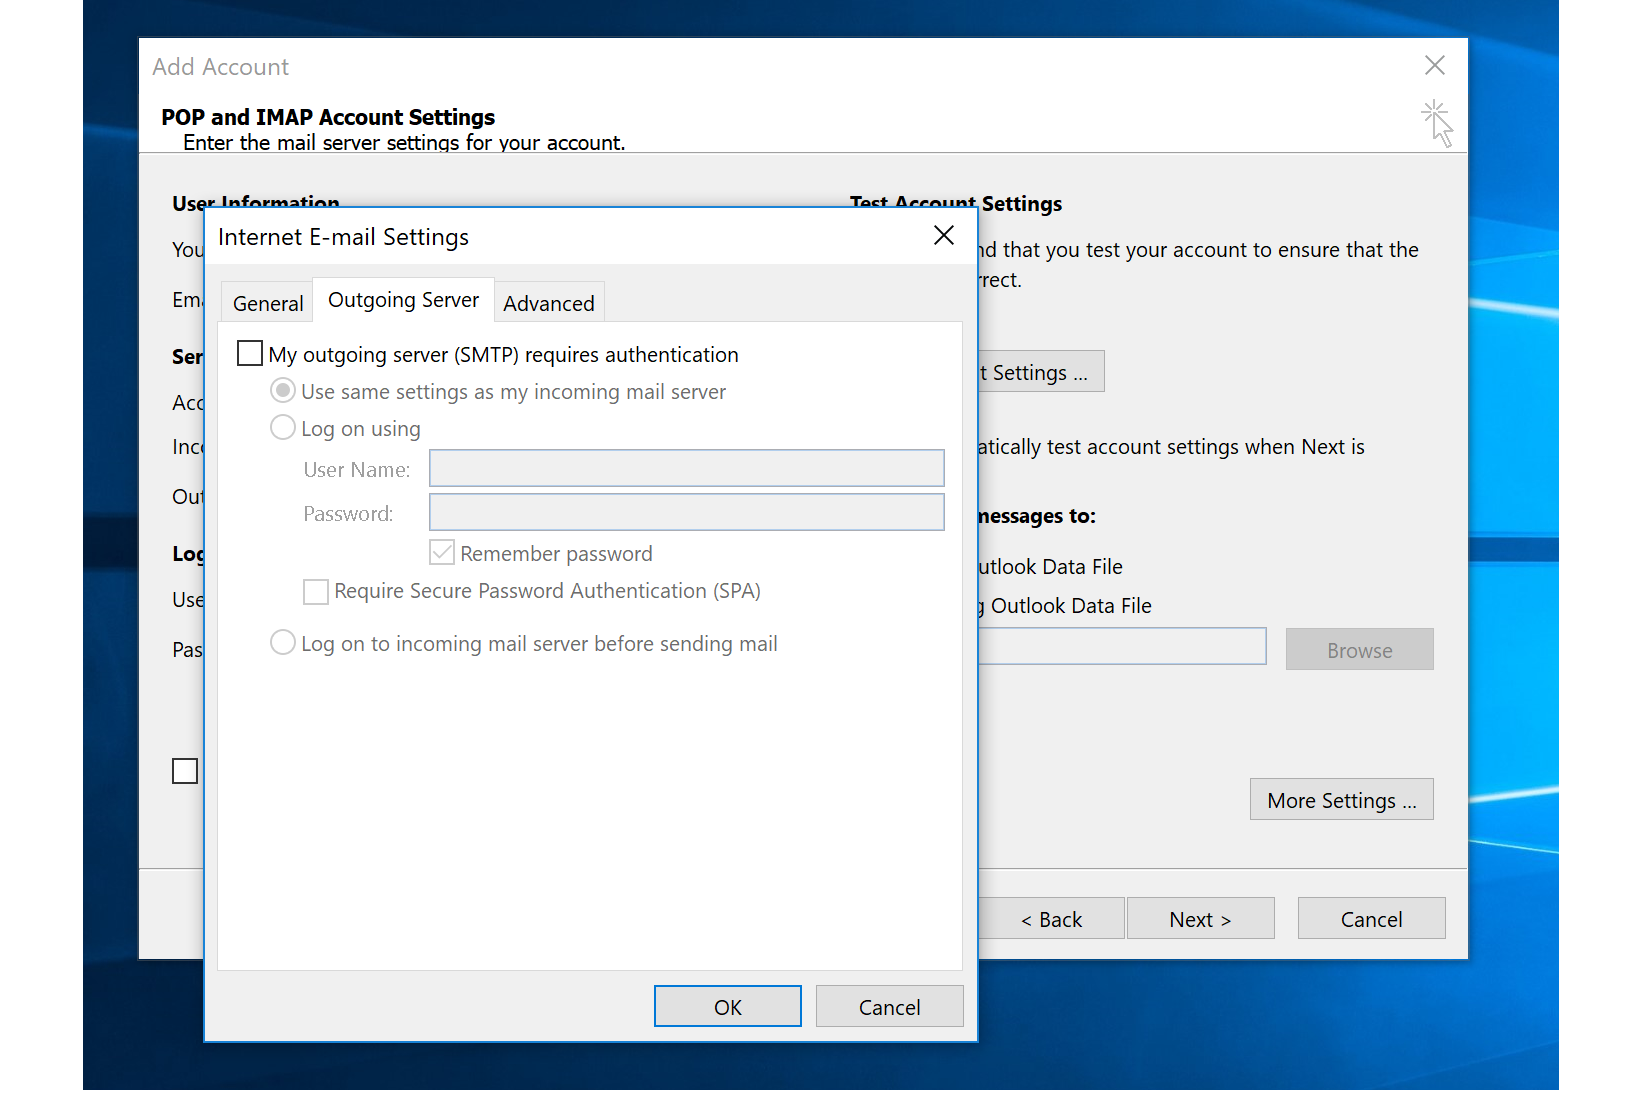
- Internet E-mail Settings –> Outgoing Server tab — Under the “Outgoing Server” tab, by default, these settings should be empty and/or unchecked, leave these settings as is (shown below), or if any of the settings look different than what is below, simply match your settings to the settings below. Then click on the “Advanced” tab.
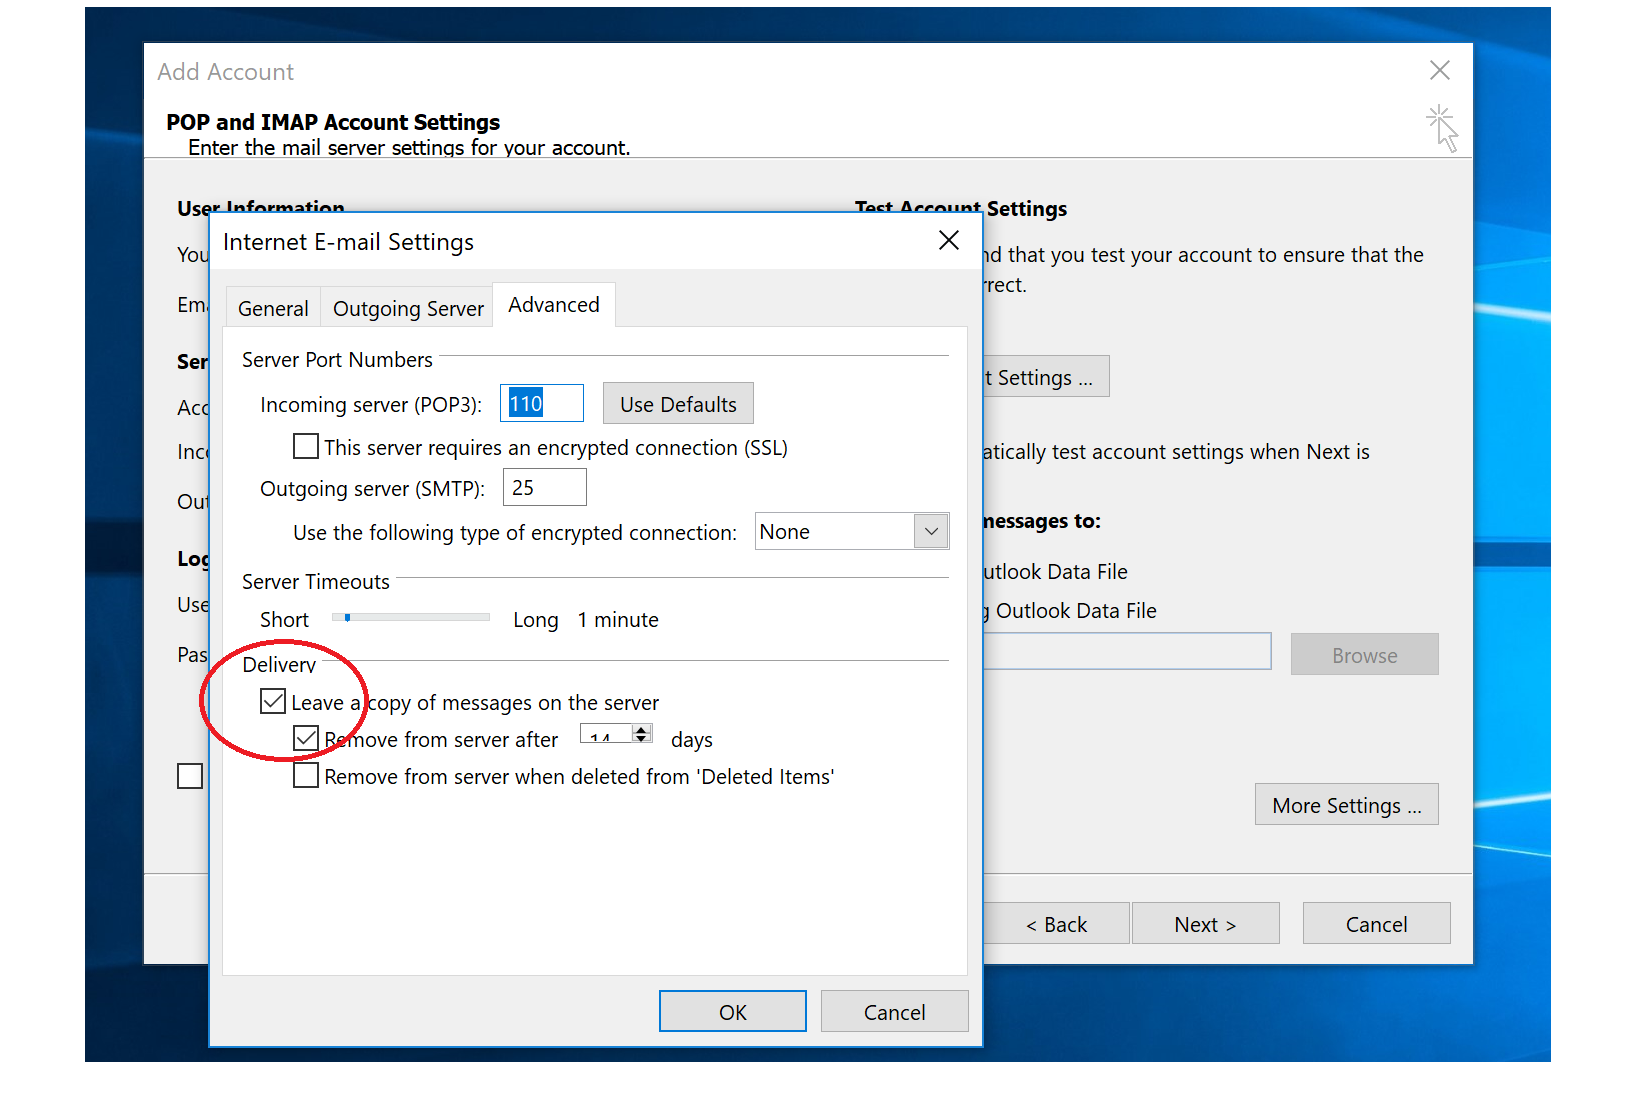
- Internet E-mail Settings –> Advanced tab — By default, these settings should be set correctly, but just in case, please see screenshot below and match your settings with the settings in the image. As for what is circled in red “Delivery“, NCKCN recommends that you un-check the box for “Leave a copy of messages on the server“. Un-checking this box will ensure your NCKCN mailbox storage doesn’t reach its quota limit as this email client will download the only copy of the email and will not keep a copy of it on the server. If you leave this option checked, you may end up reaching your quota limit. If you reach your quota limit, you will be unable to receive/send any future emails until you clear out or delete your emails from your NCKCN mailbox. Next, click “OK“.
- Back to the POP and IMAP Account Settings — Now that you have all the information you need, click “Next“.

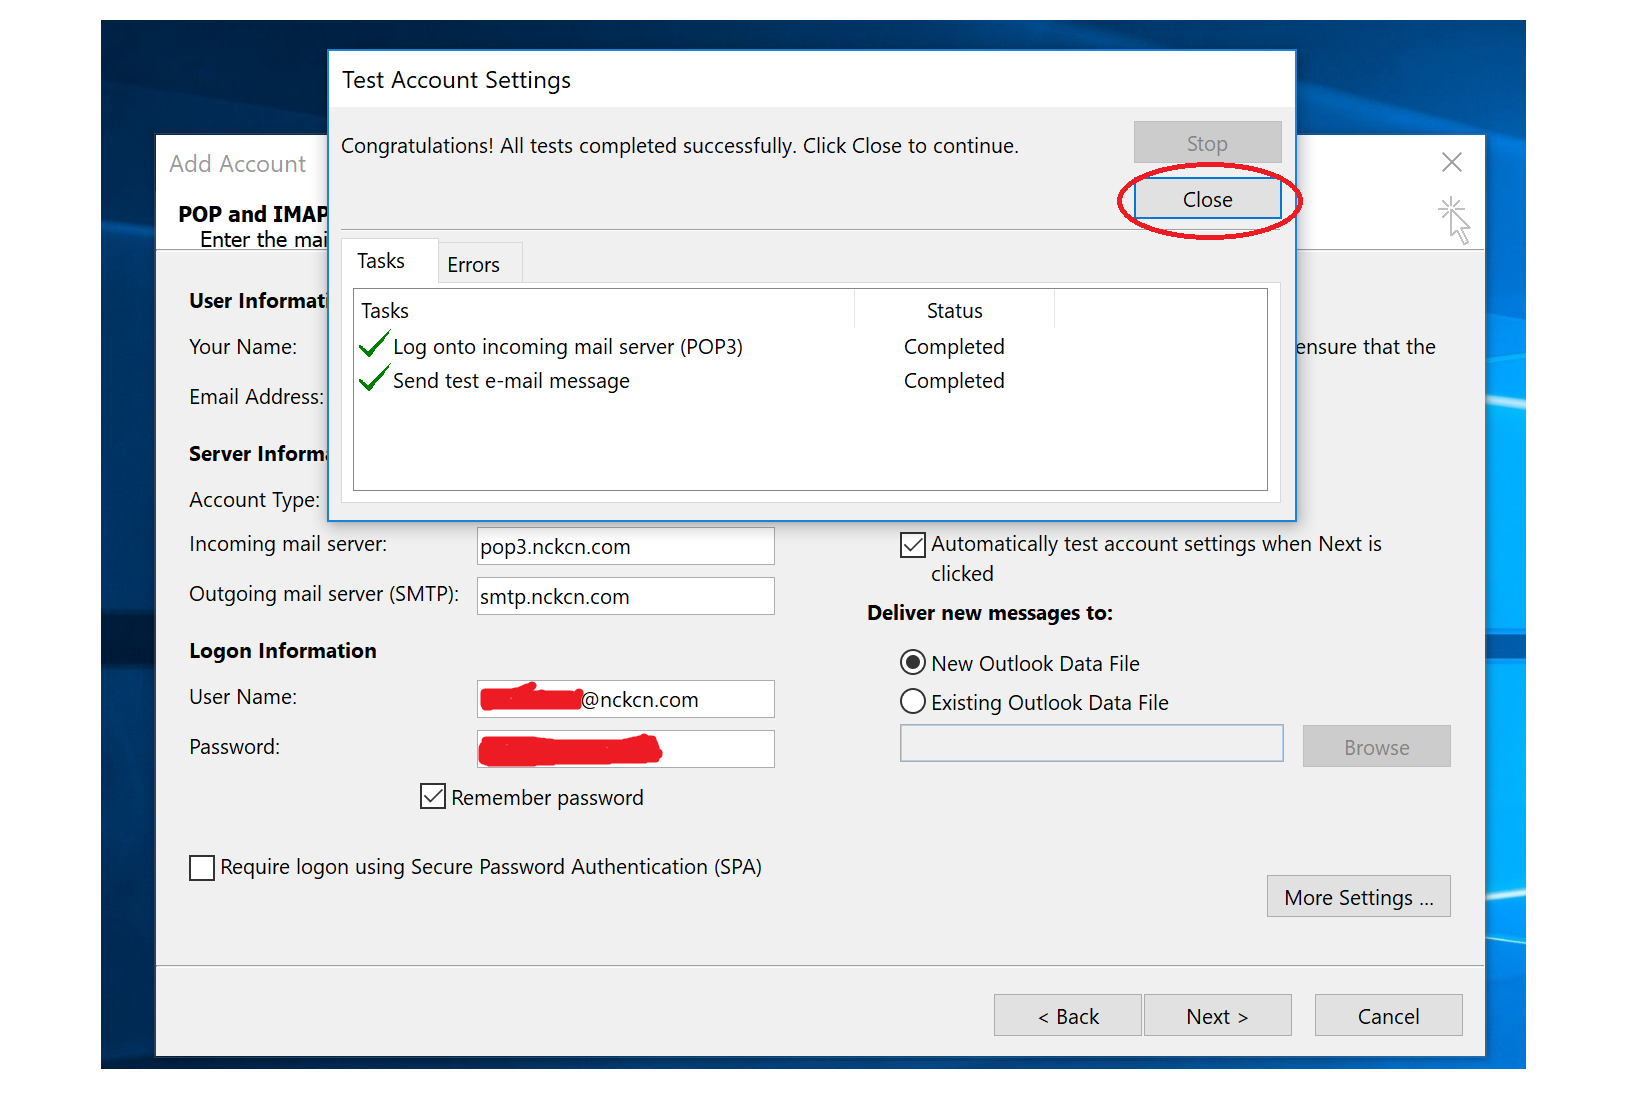
- Test Account Settings — Once you have clicked “Next” from the above step, a new window will open up of which tests your account settings. Let this run until you see the “Status” change to “Completed” for any/all “Tasks“. Once the test is complete and there are no “Errors“, you can click the “Close” button on this window.
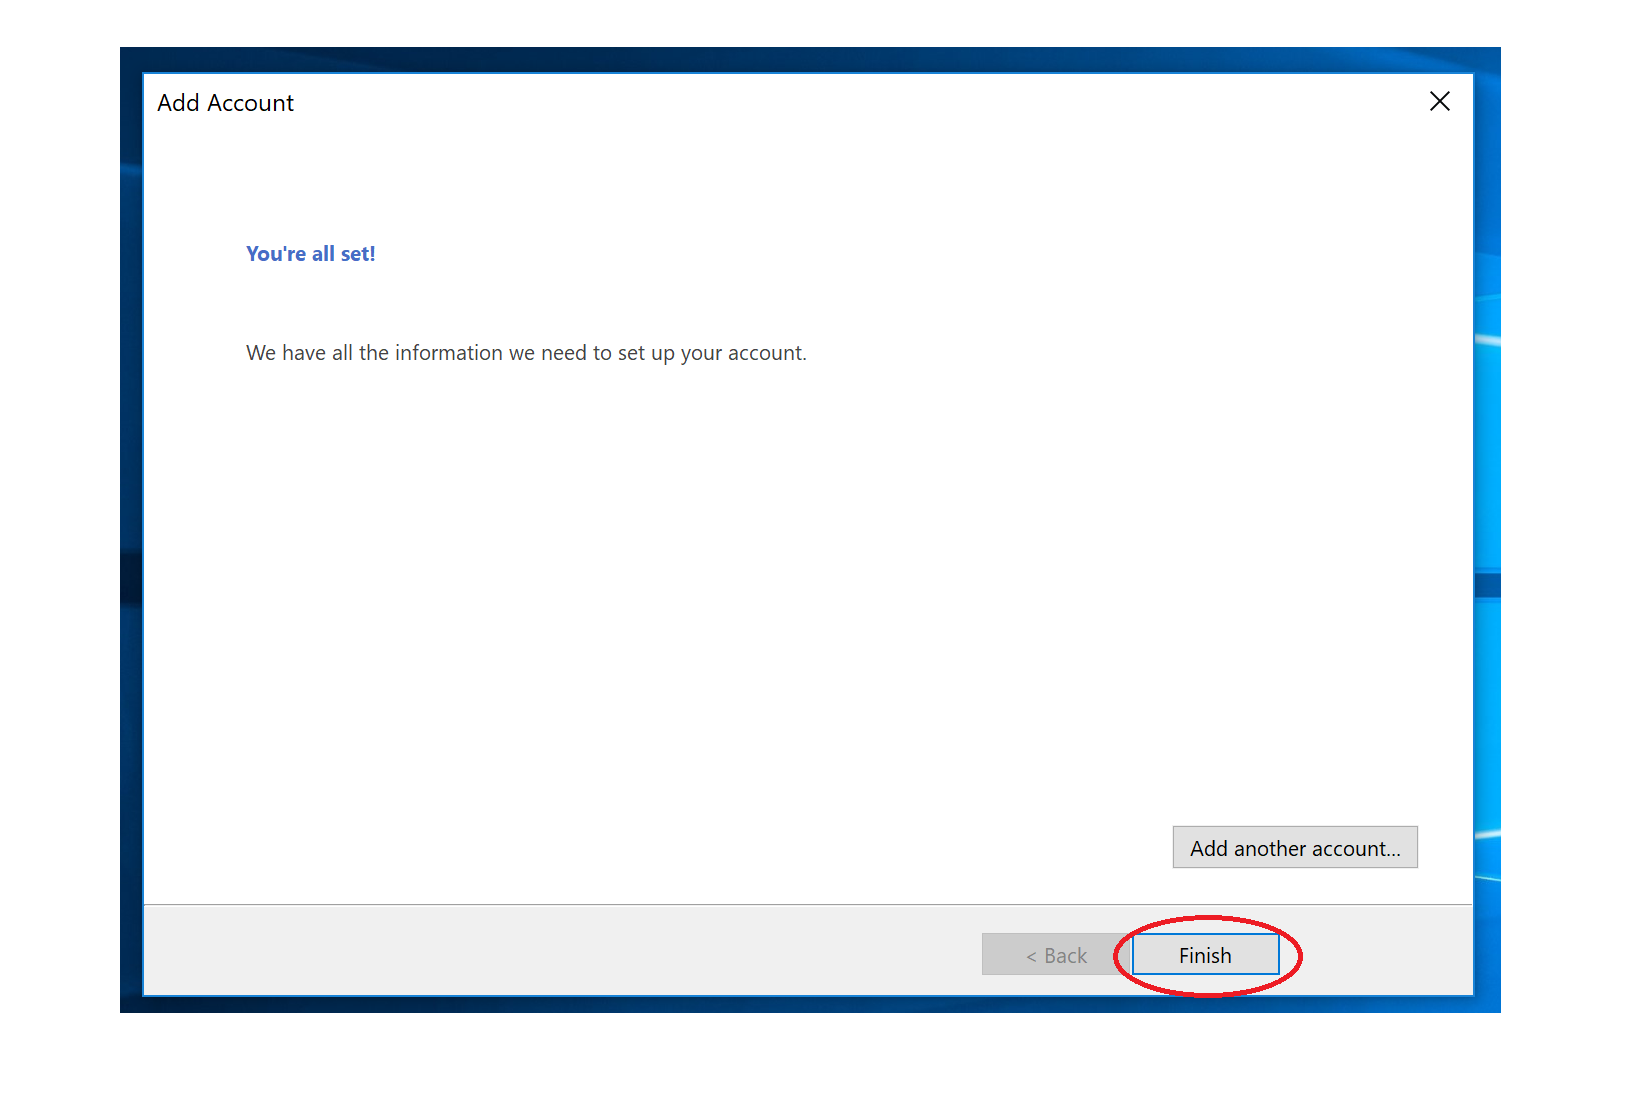
- Final step — You’re all set! Click “Finish“. You can now begin using the email client: Outlook 2016 to send/receive emails with your NCKCN email account. Hoooooray!
- If this is the first time using Outlook 2016, you will be prompted with a “Welcome” message. Click “Next“. If this is not your first time using this email client, you will need to click on “File” and then select “Add Account” which is under “Account Information“. If this is not your first time using this email client and you have clicked “Add Account”, please skip to: Auto Account Setup below.
==========
Thunderbird
- Open Thunderbird
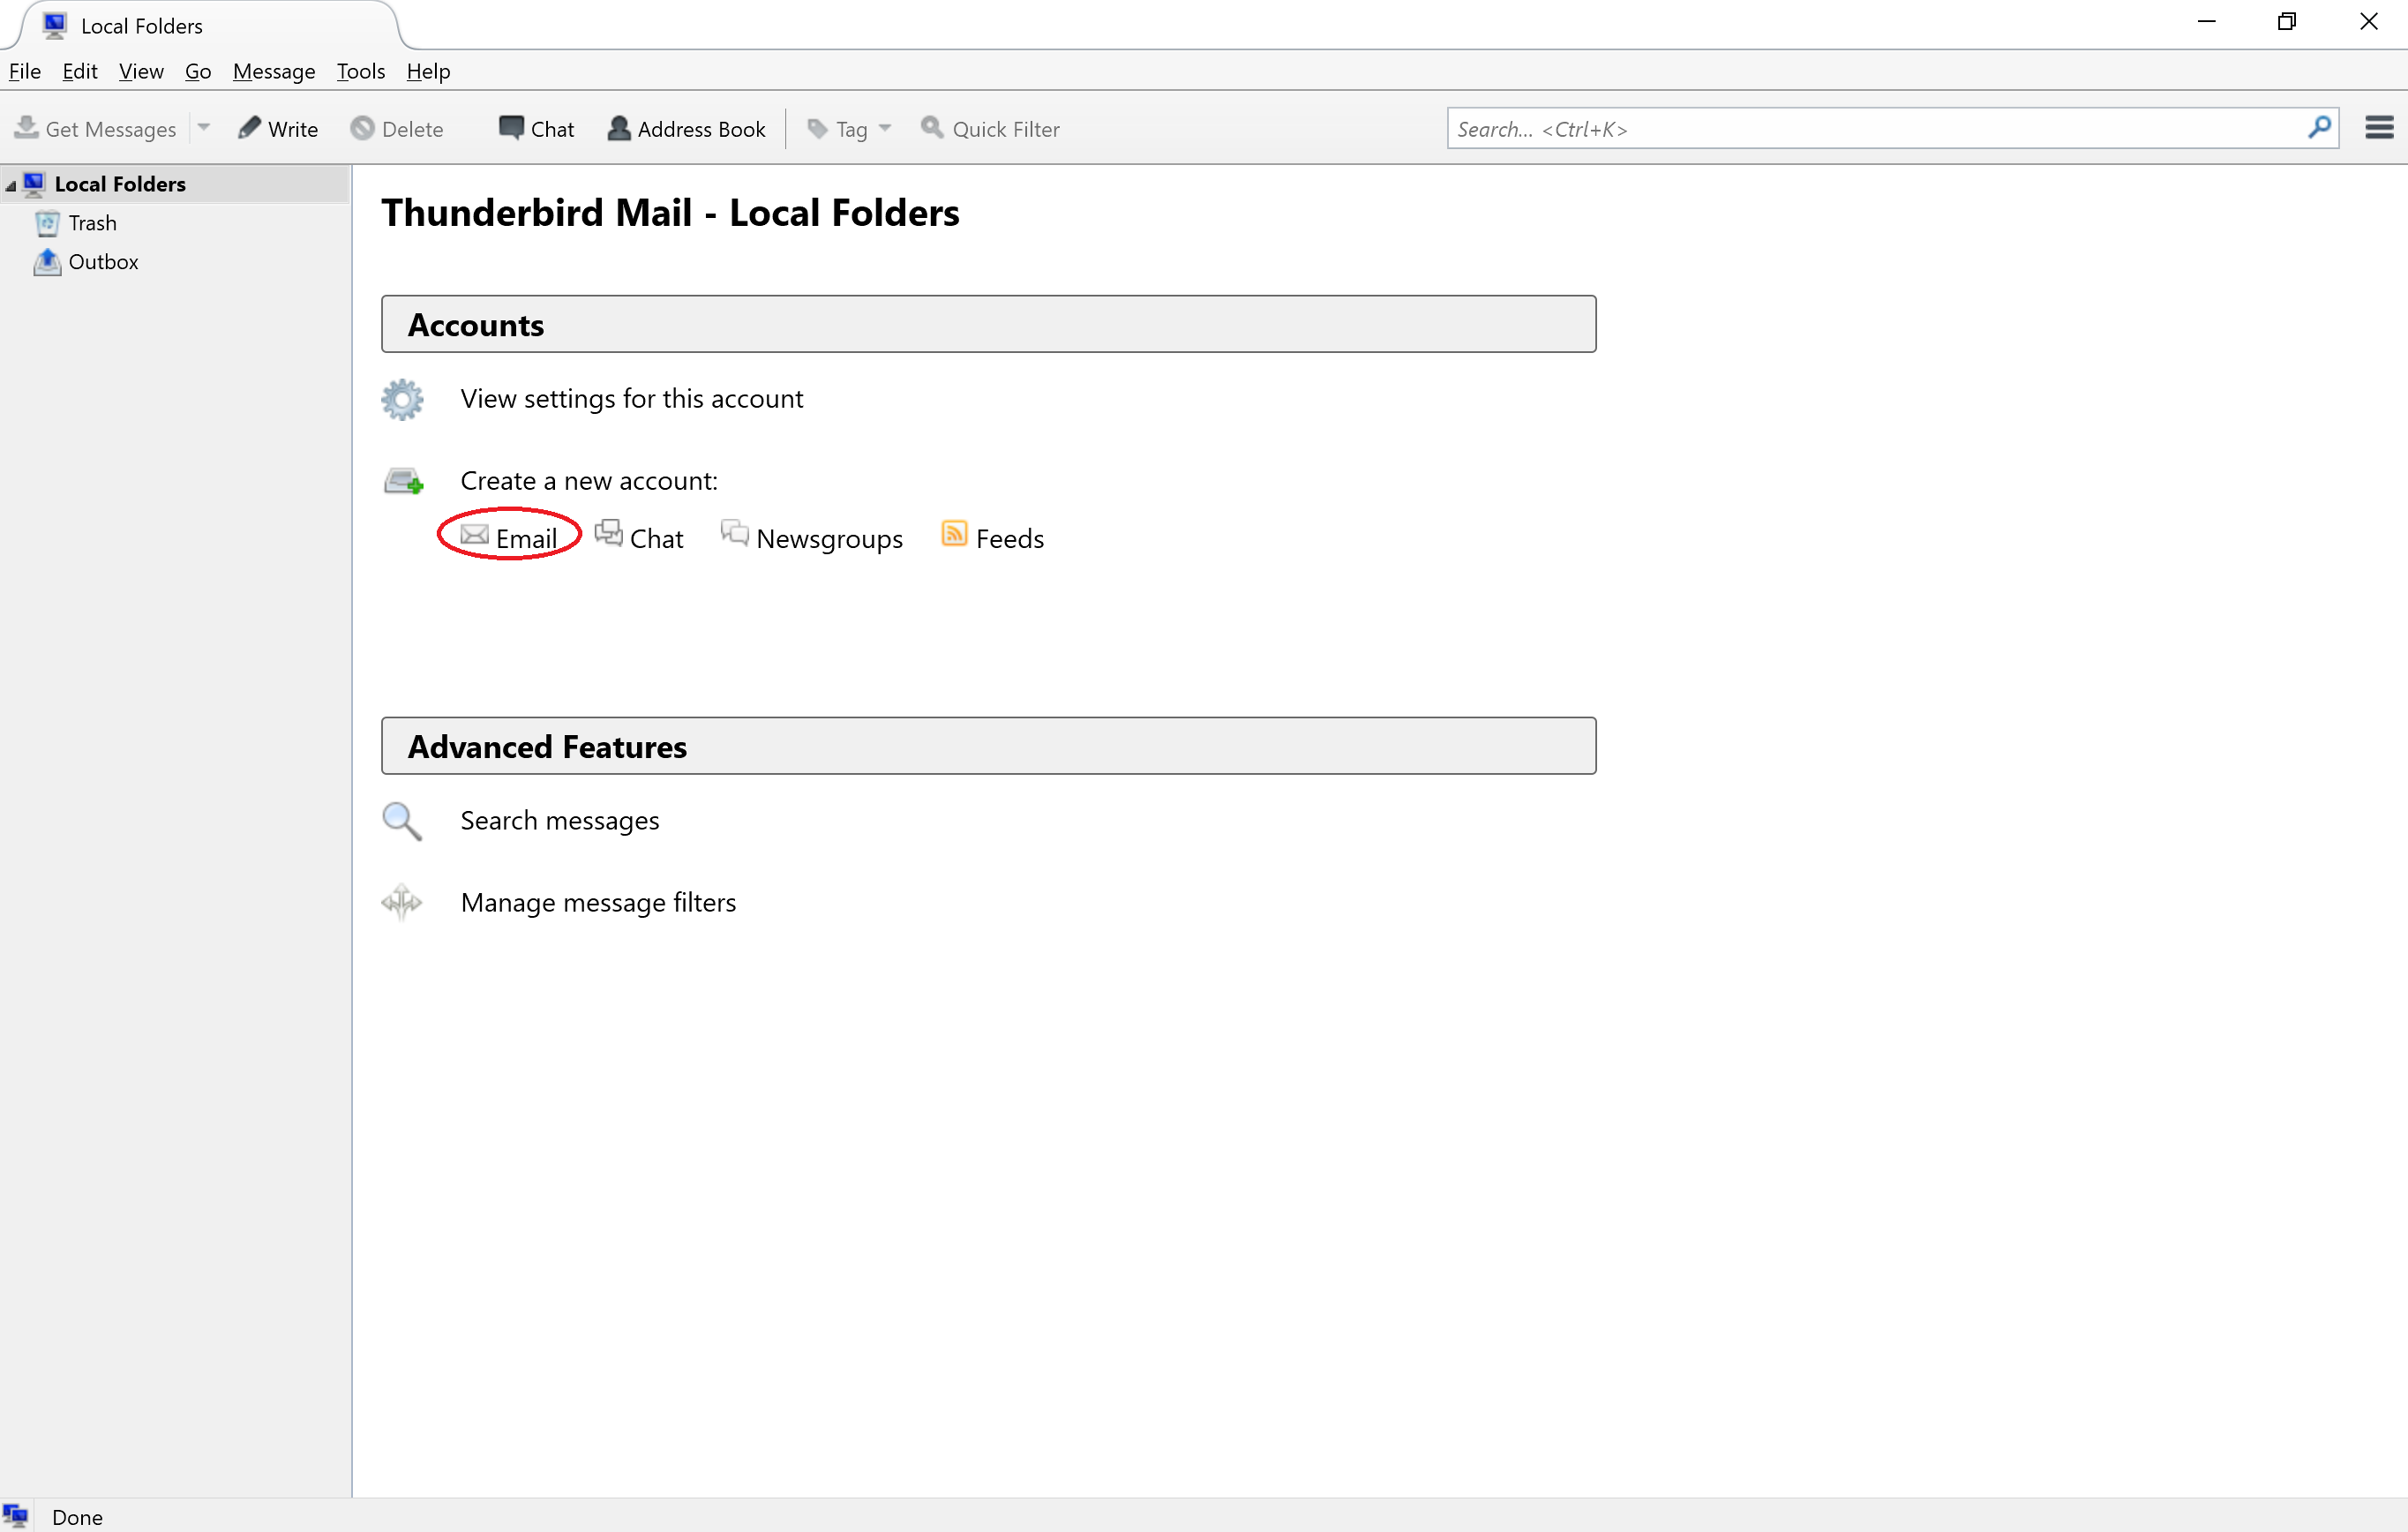
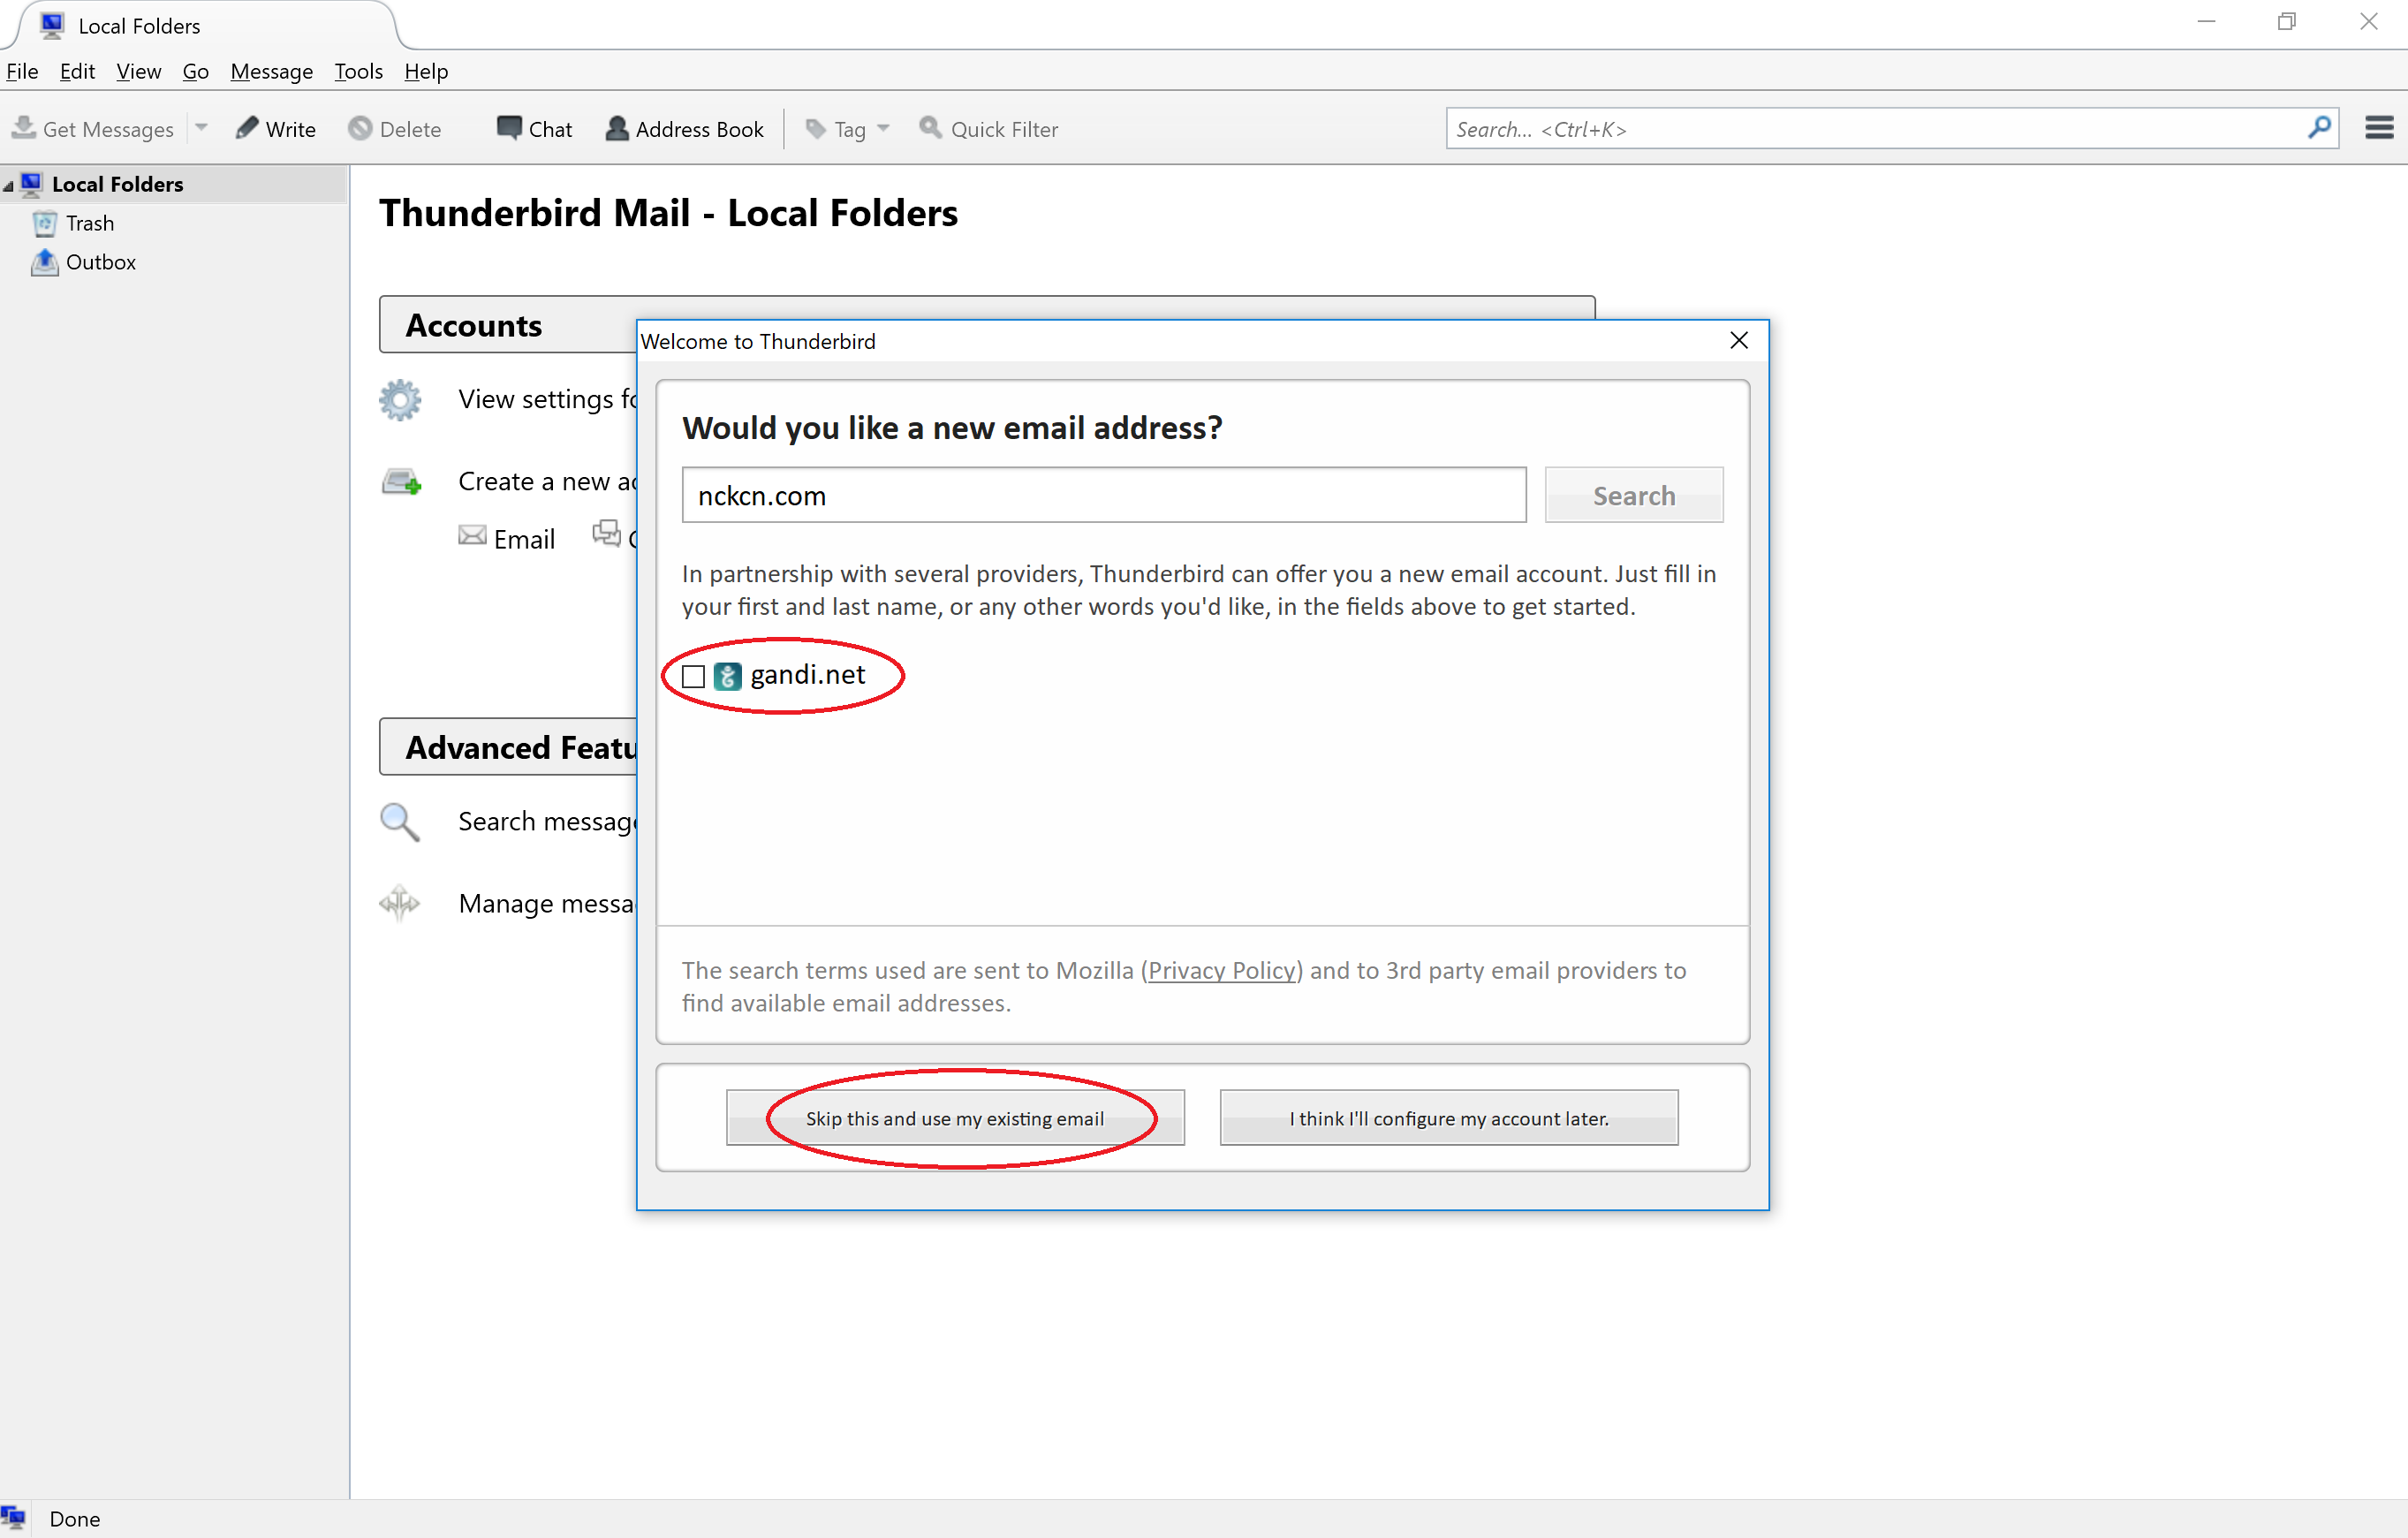
- Click “Email” under “Create a new account:“.
- Un-check the box for “gandi.net” and then click “Skip this and use my existing email“.
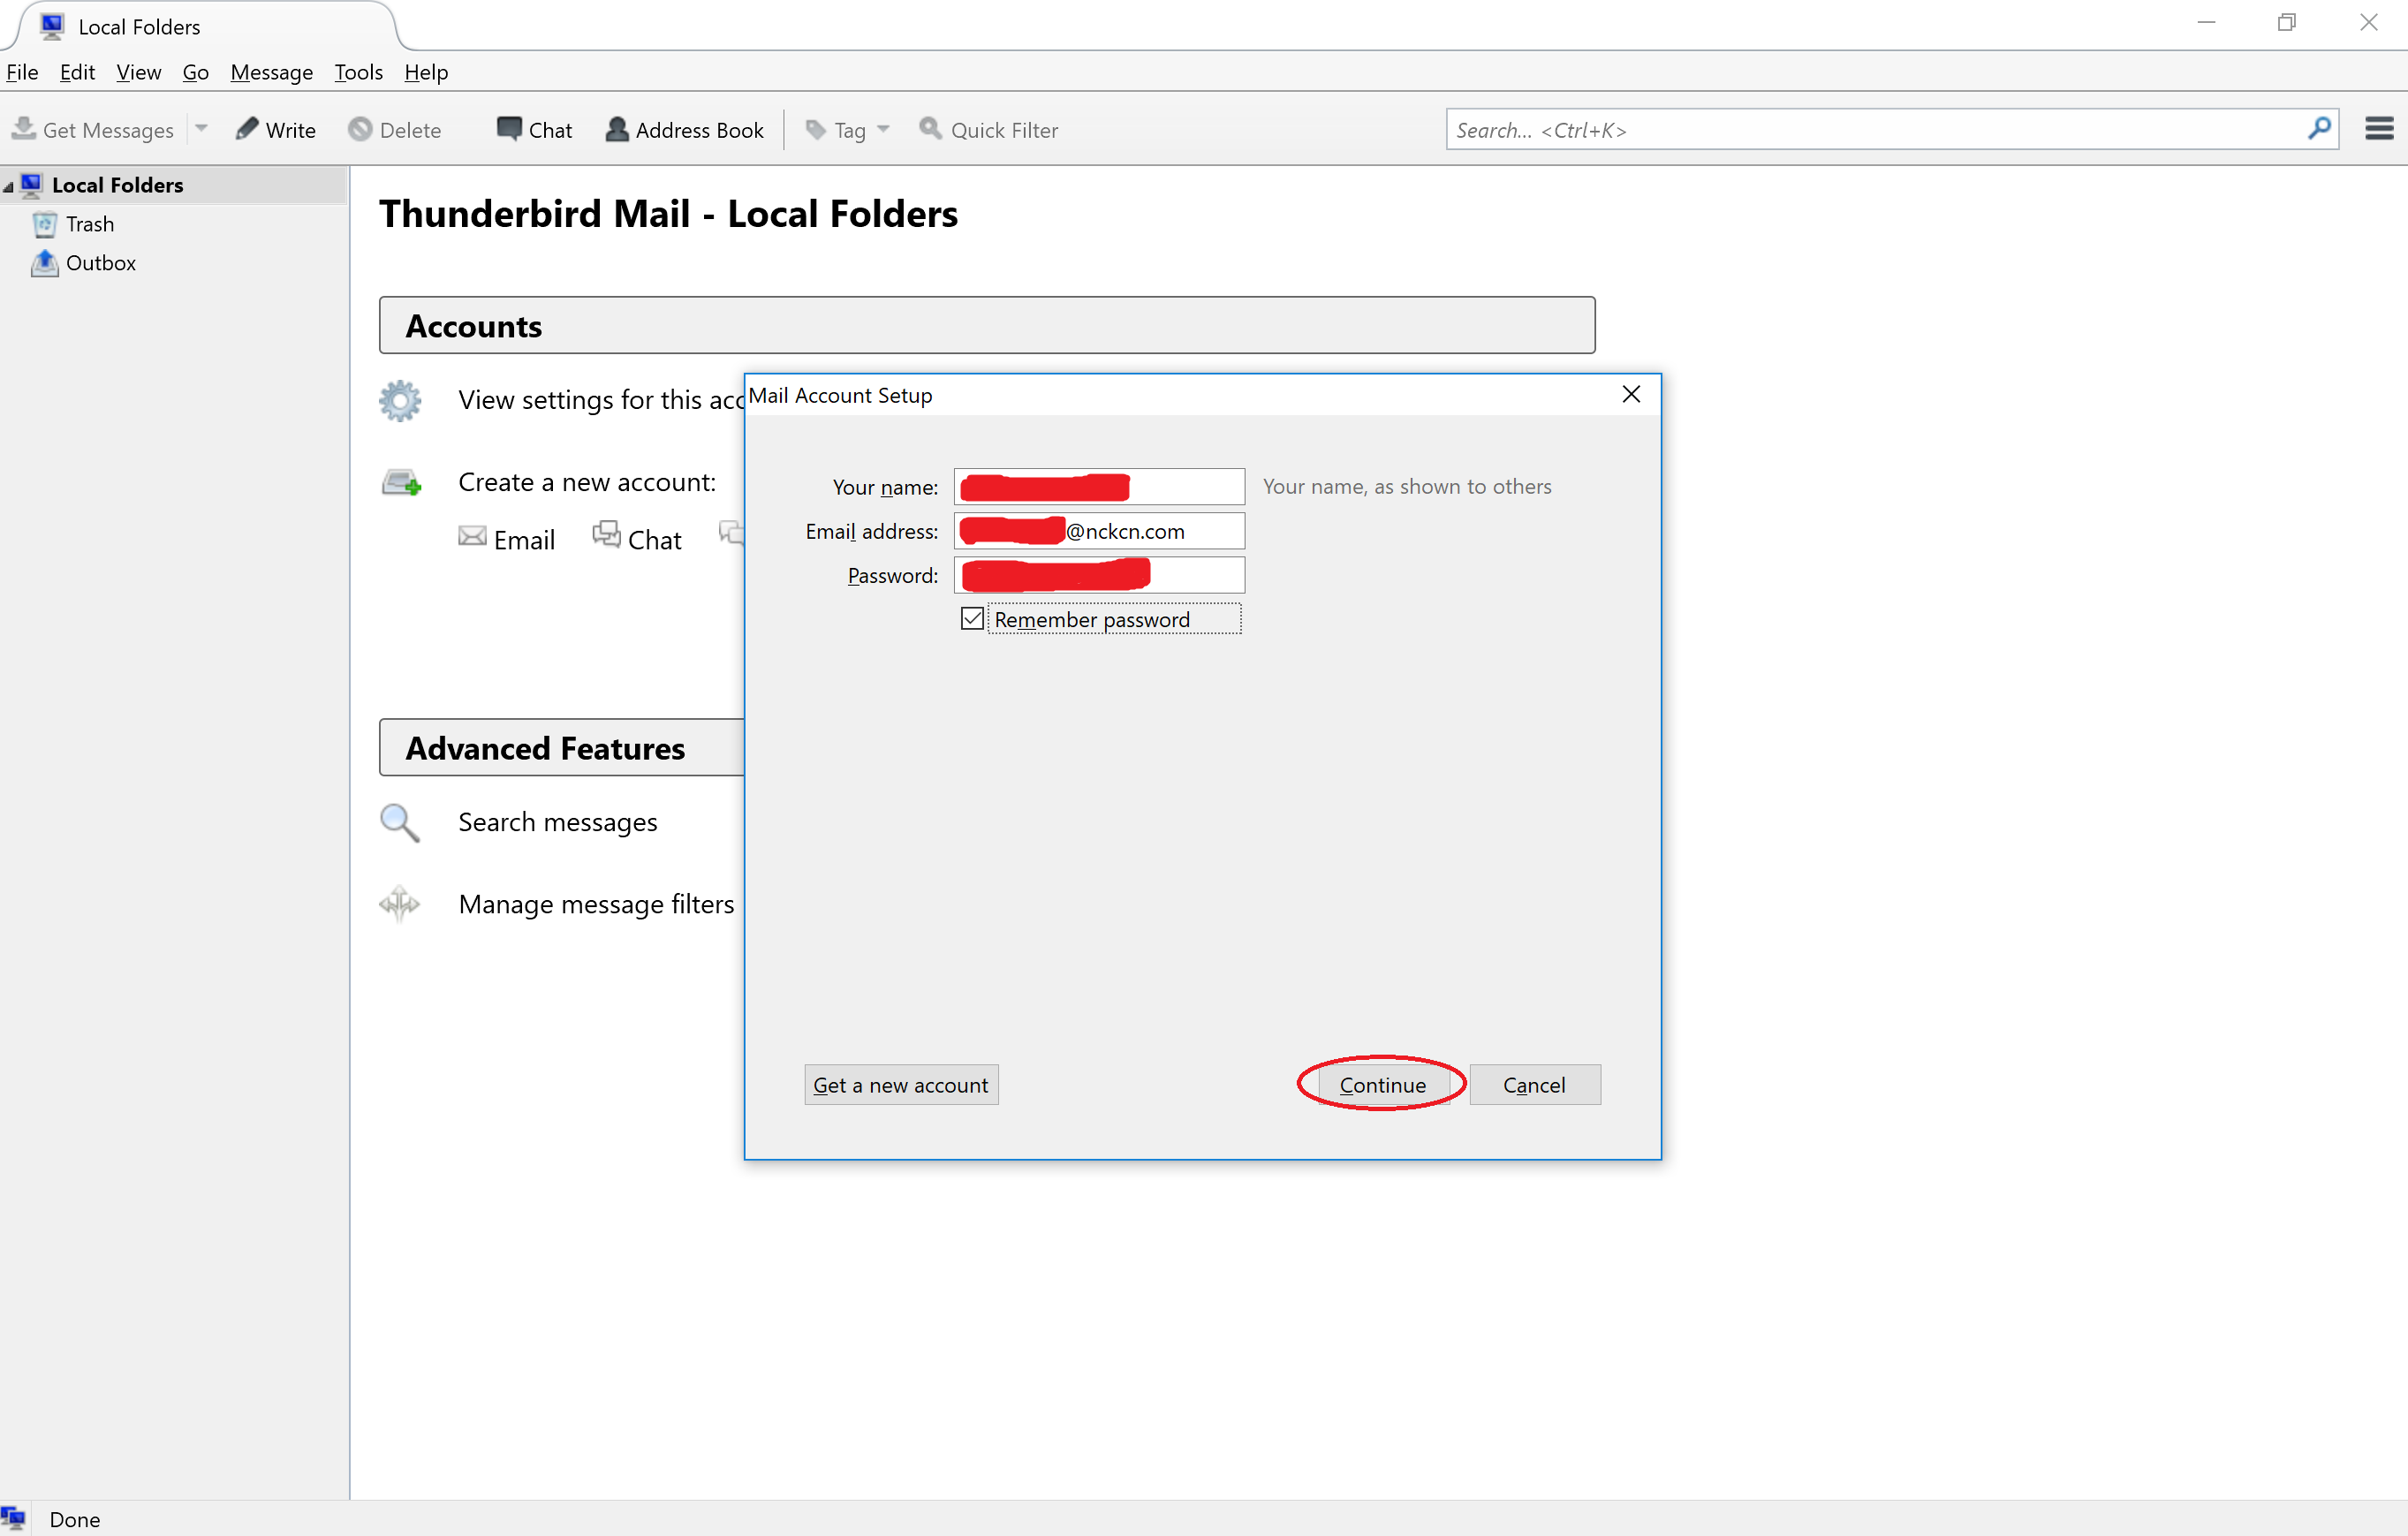
- Type in your name, your email address and your password in the respective fields and then click “Continue“.
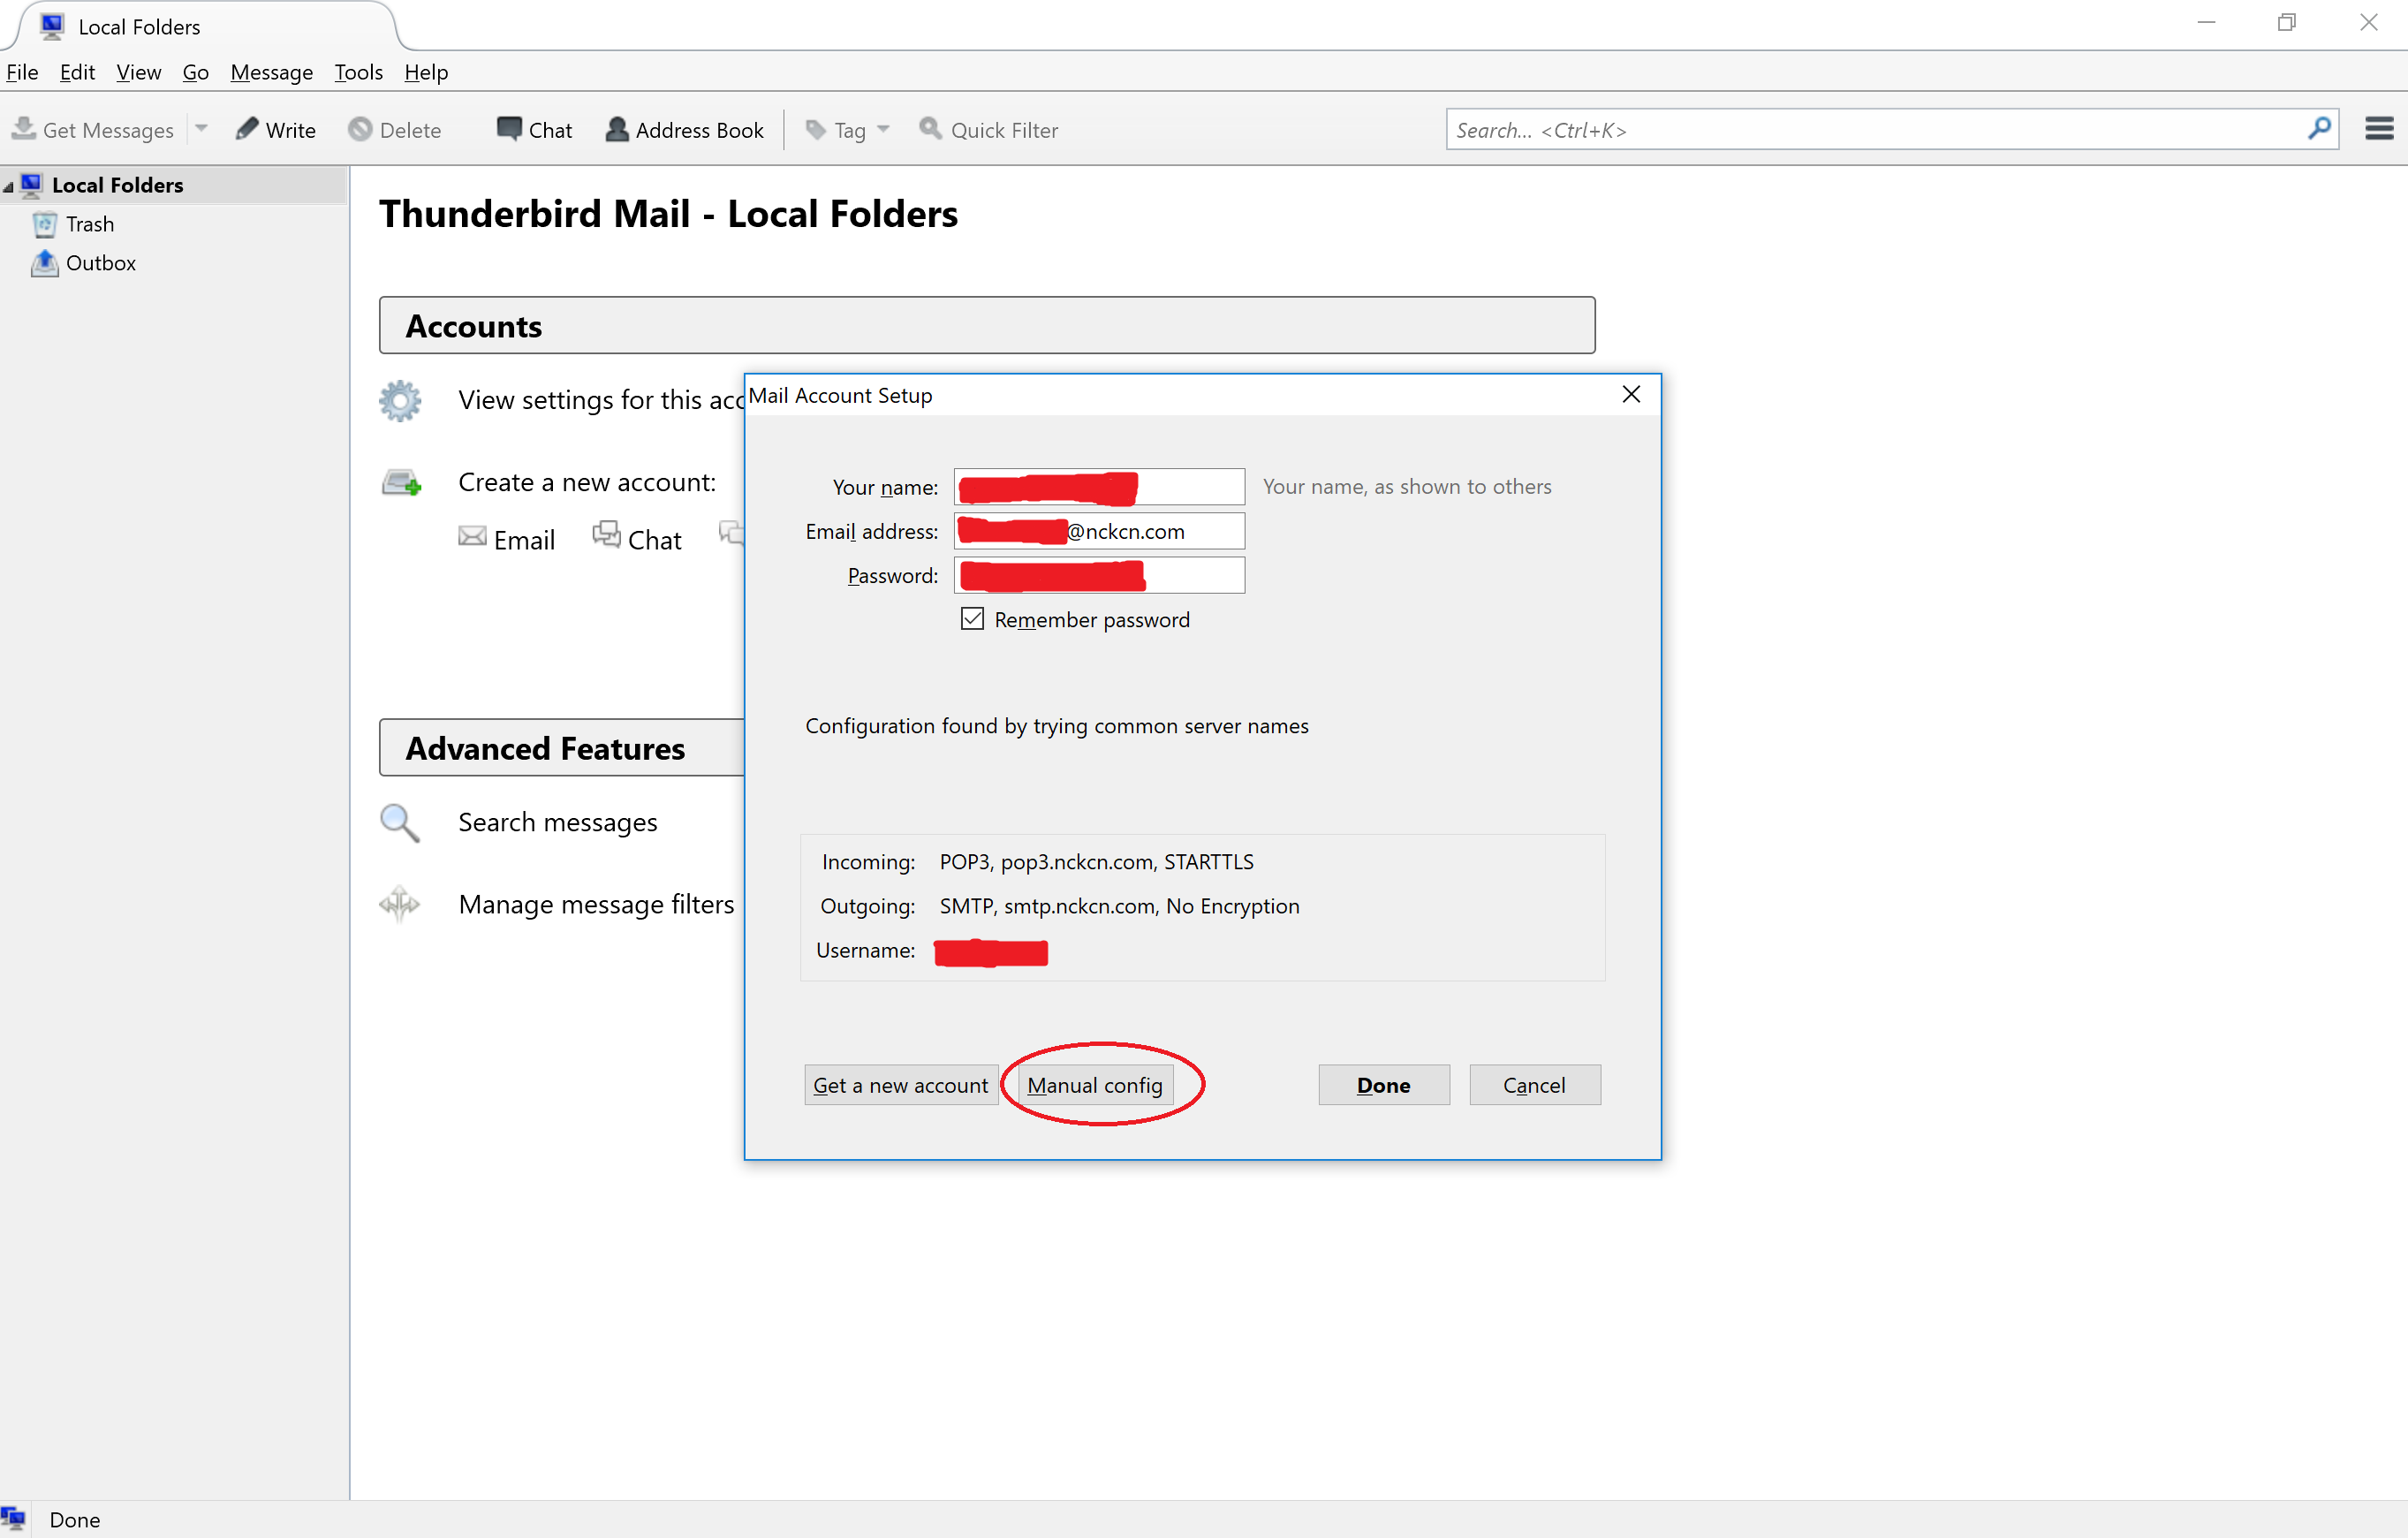
- Next you will want to wait until Thunderbird is done checking things. Once Thunderbird is done checking things, click “Manual config“.
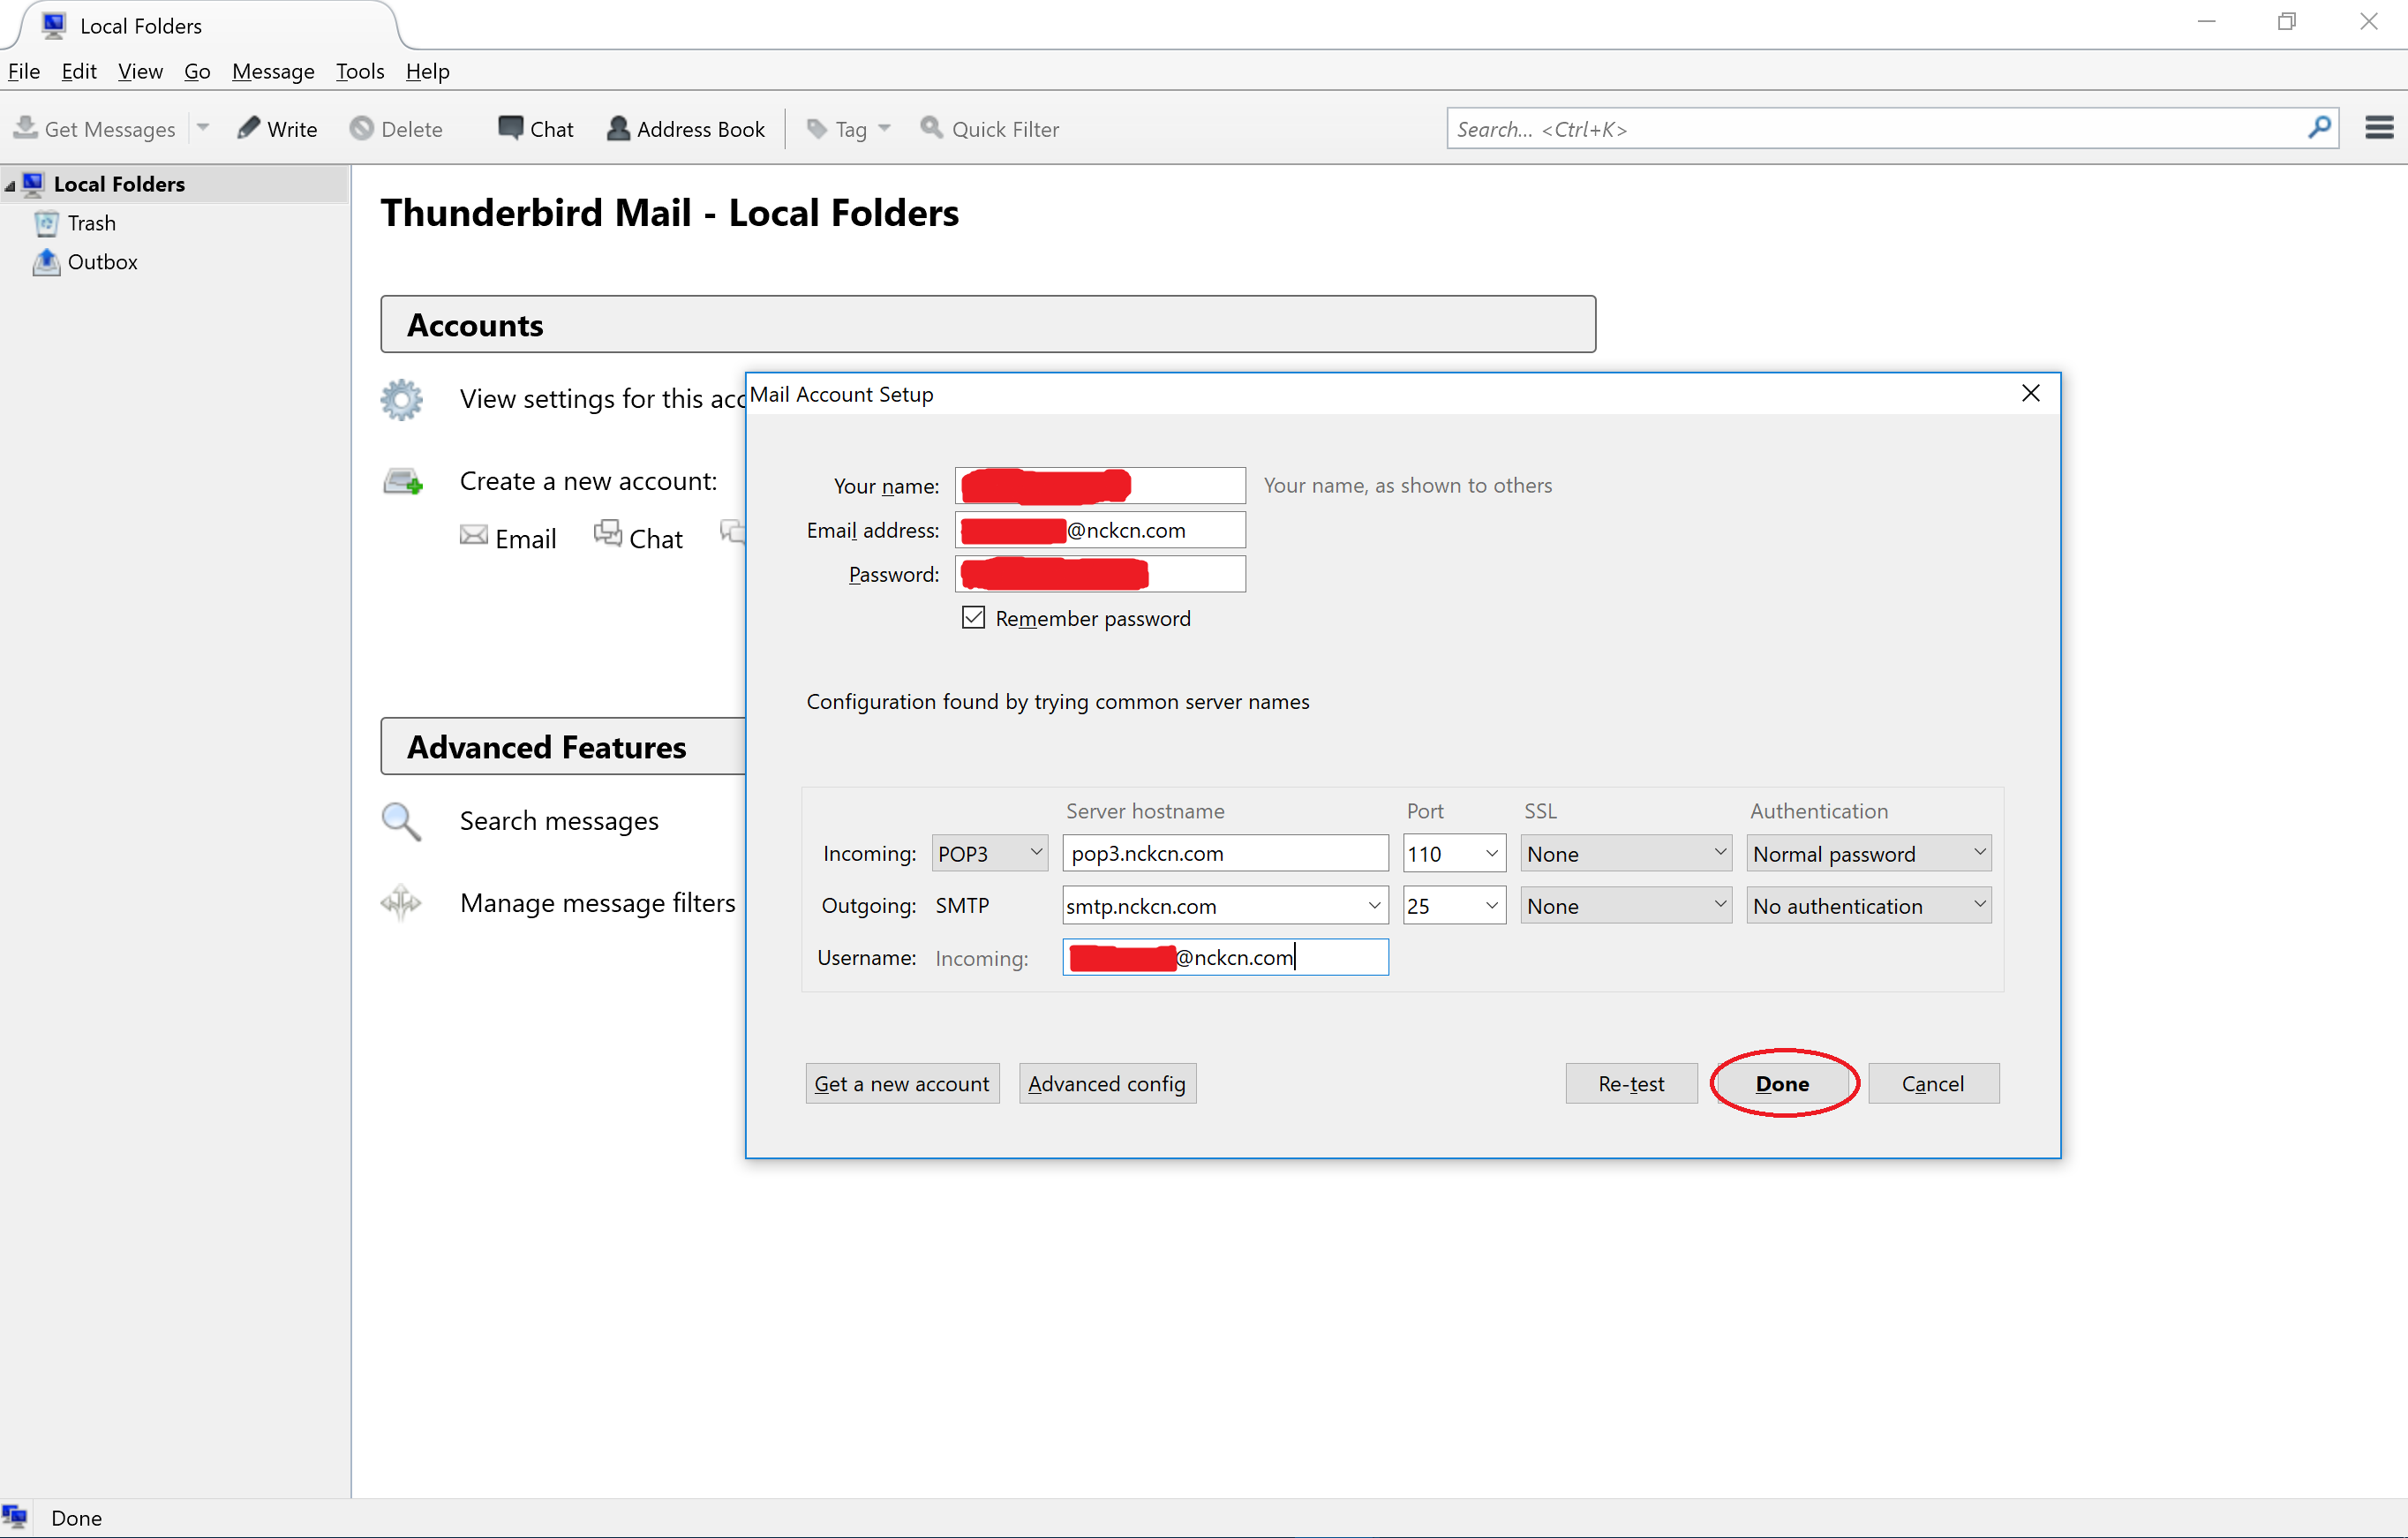
- Next, select and/or type in the following information as shown in the image below and then click “Done“.
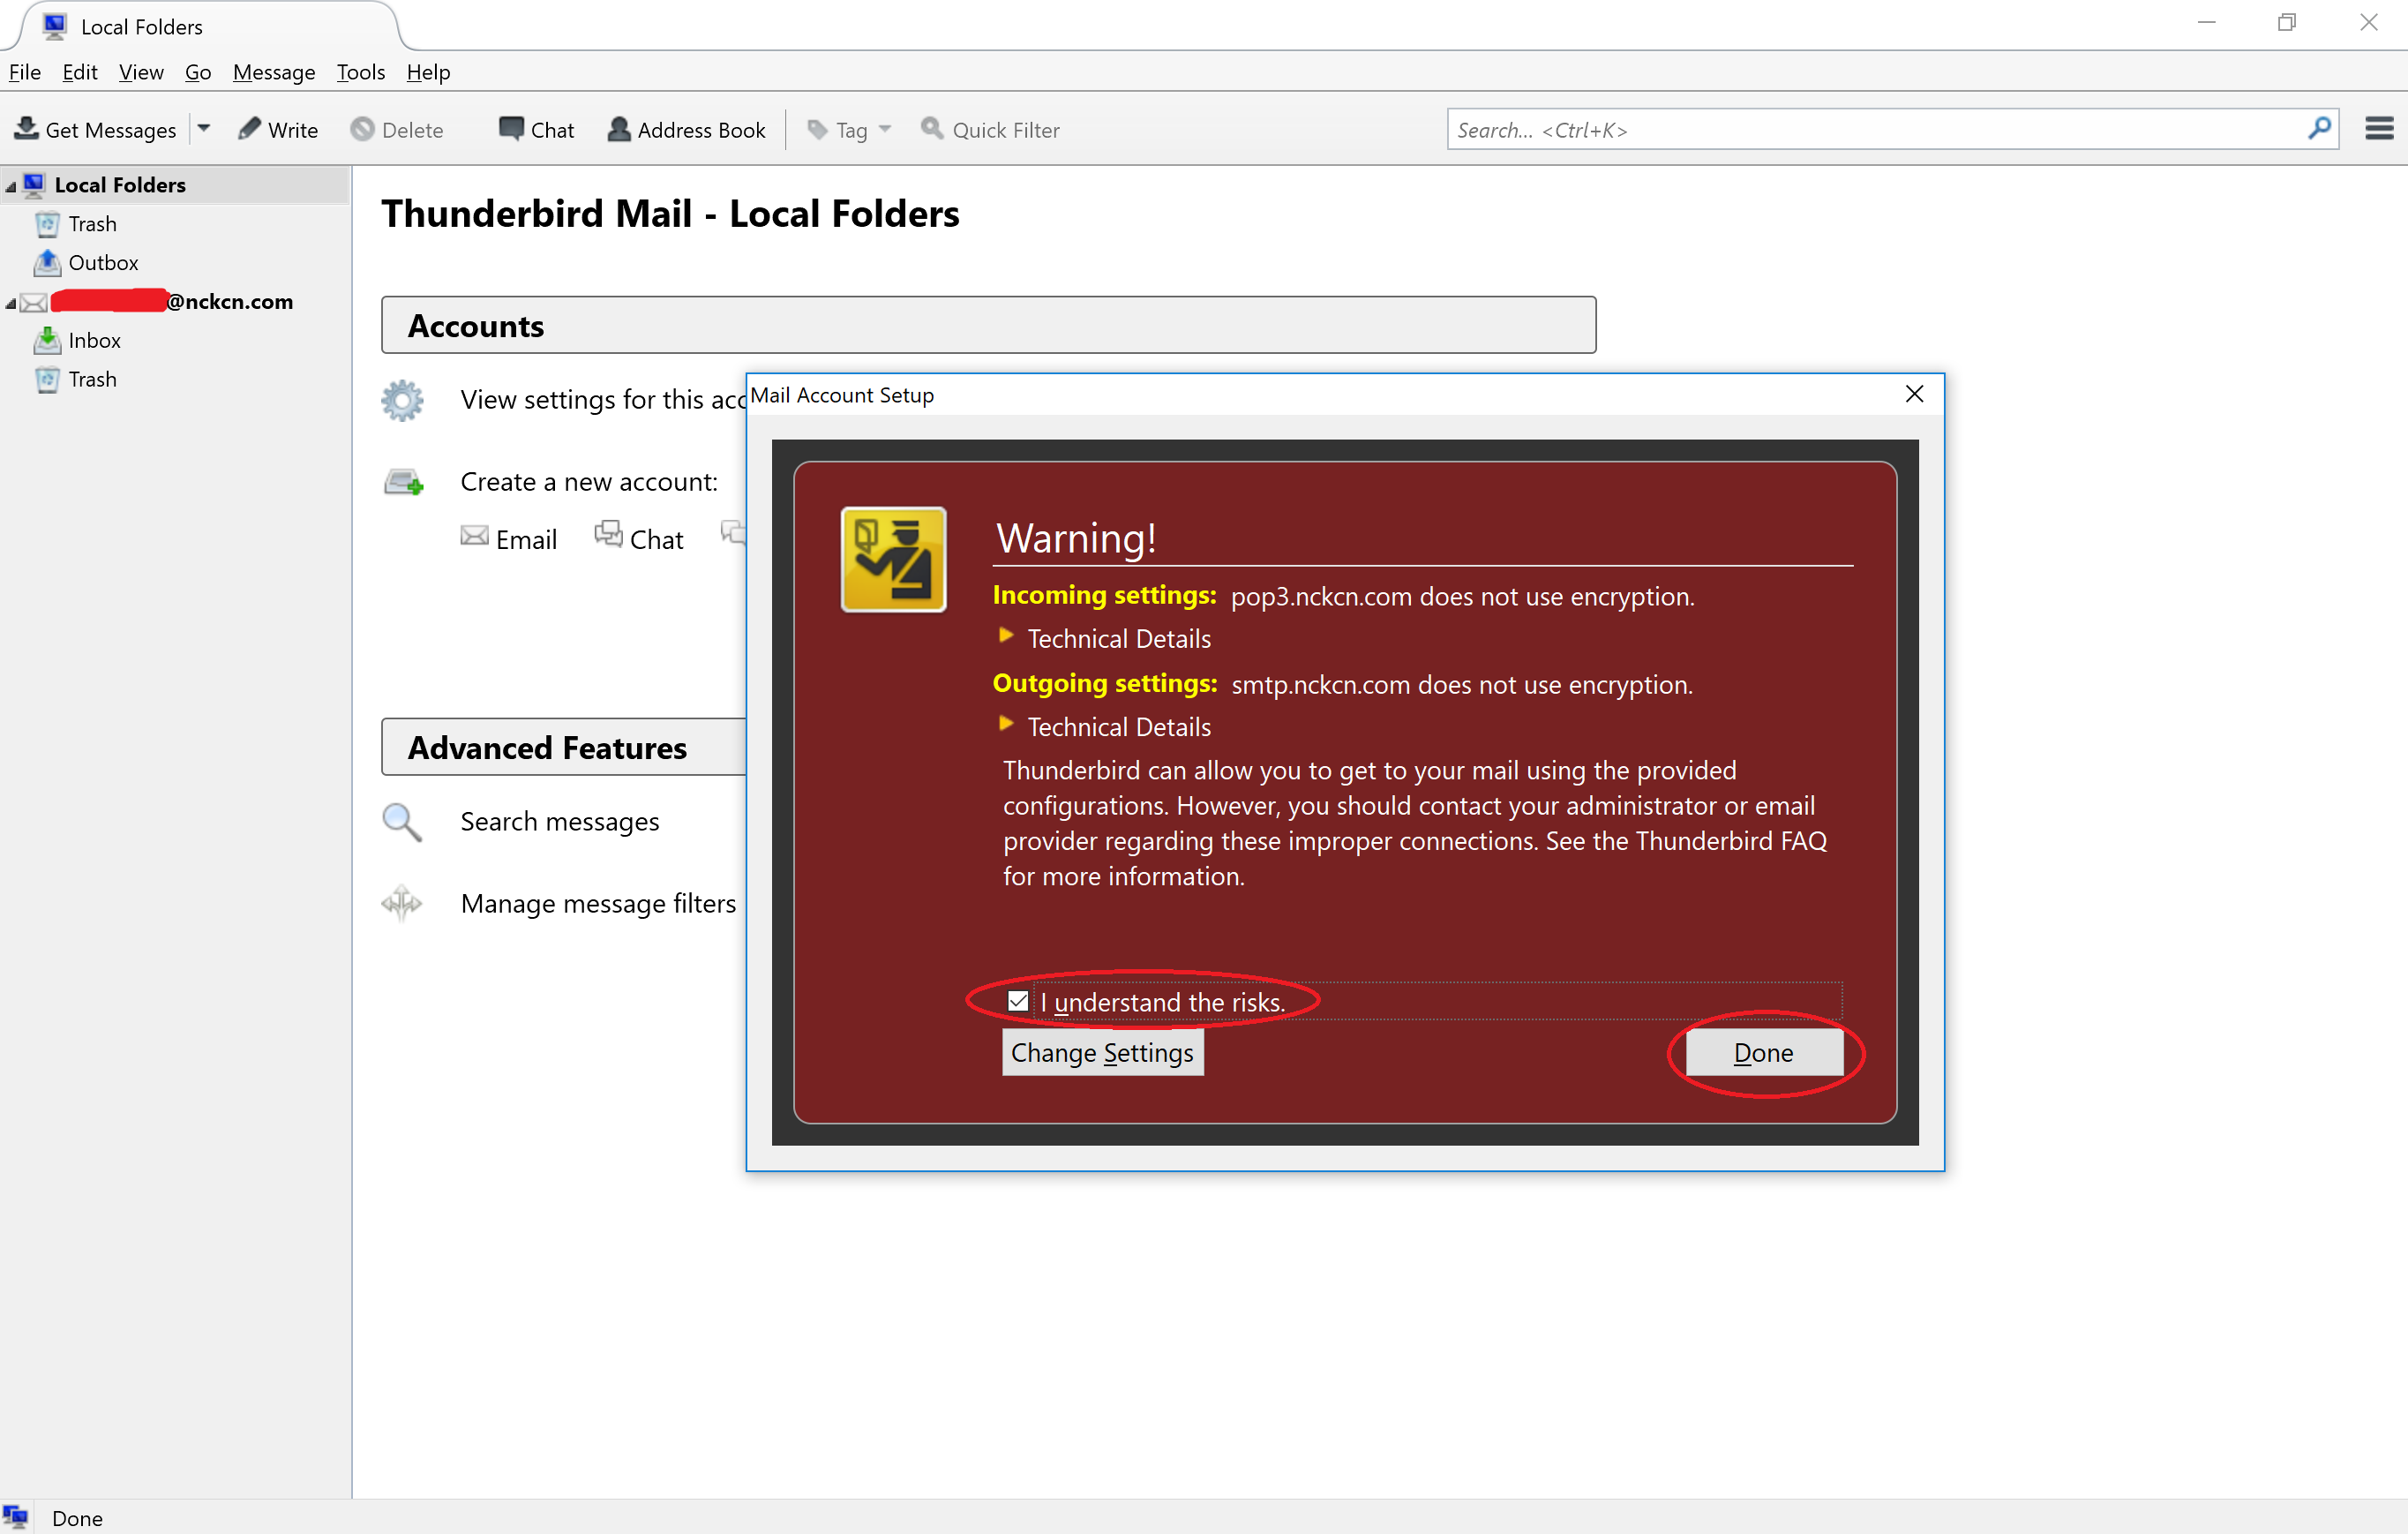
- A warning message will appear. Ensure the box for “I understand the risks.” is checked and then click “Done“. You can now begin using the email client: Thunderbird to send/receive emails with your NCKCN email account. YIPEEEEEEEEE!
- ADDITIONAL STEP (Optional) — NCKCN recommends that you un-check the box for “Leave messages on server“. Un-checking this box will ensure your NCKCN mailbox storage doesn’t reach its quota limit as this email client will download the only copy of the email and will not keep a copy of it on the server. If you leave this option checked, you may end up reaching your quota limit. If you reach your quota limit, you will be unable to receive/send any future emails until you clear out or delete your emails from your NCKCN mailbox.
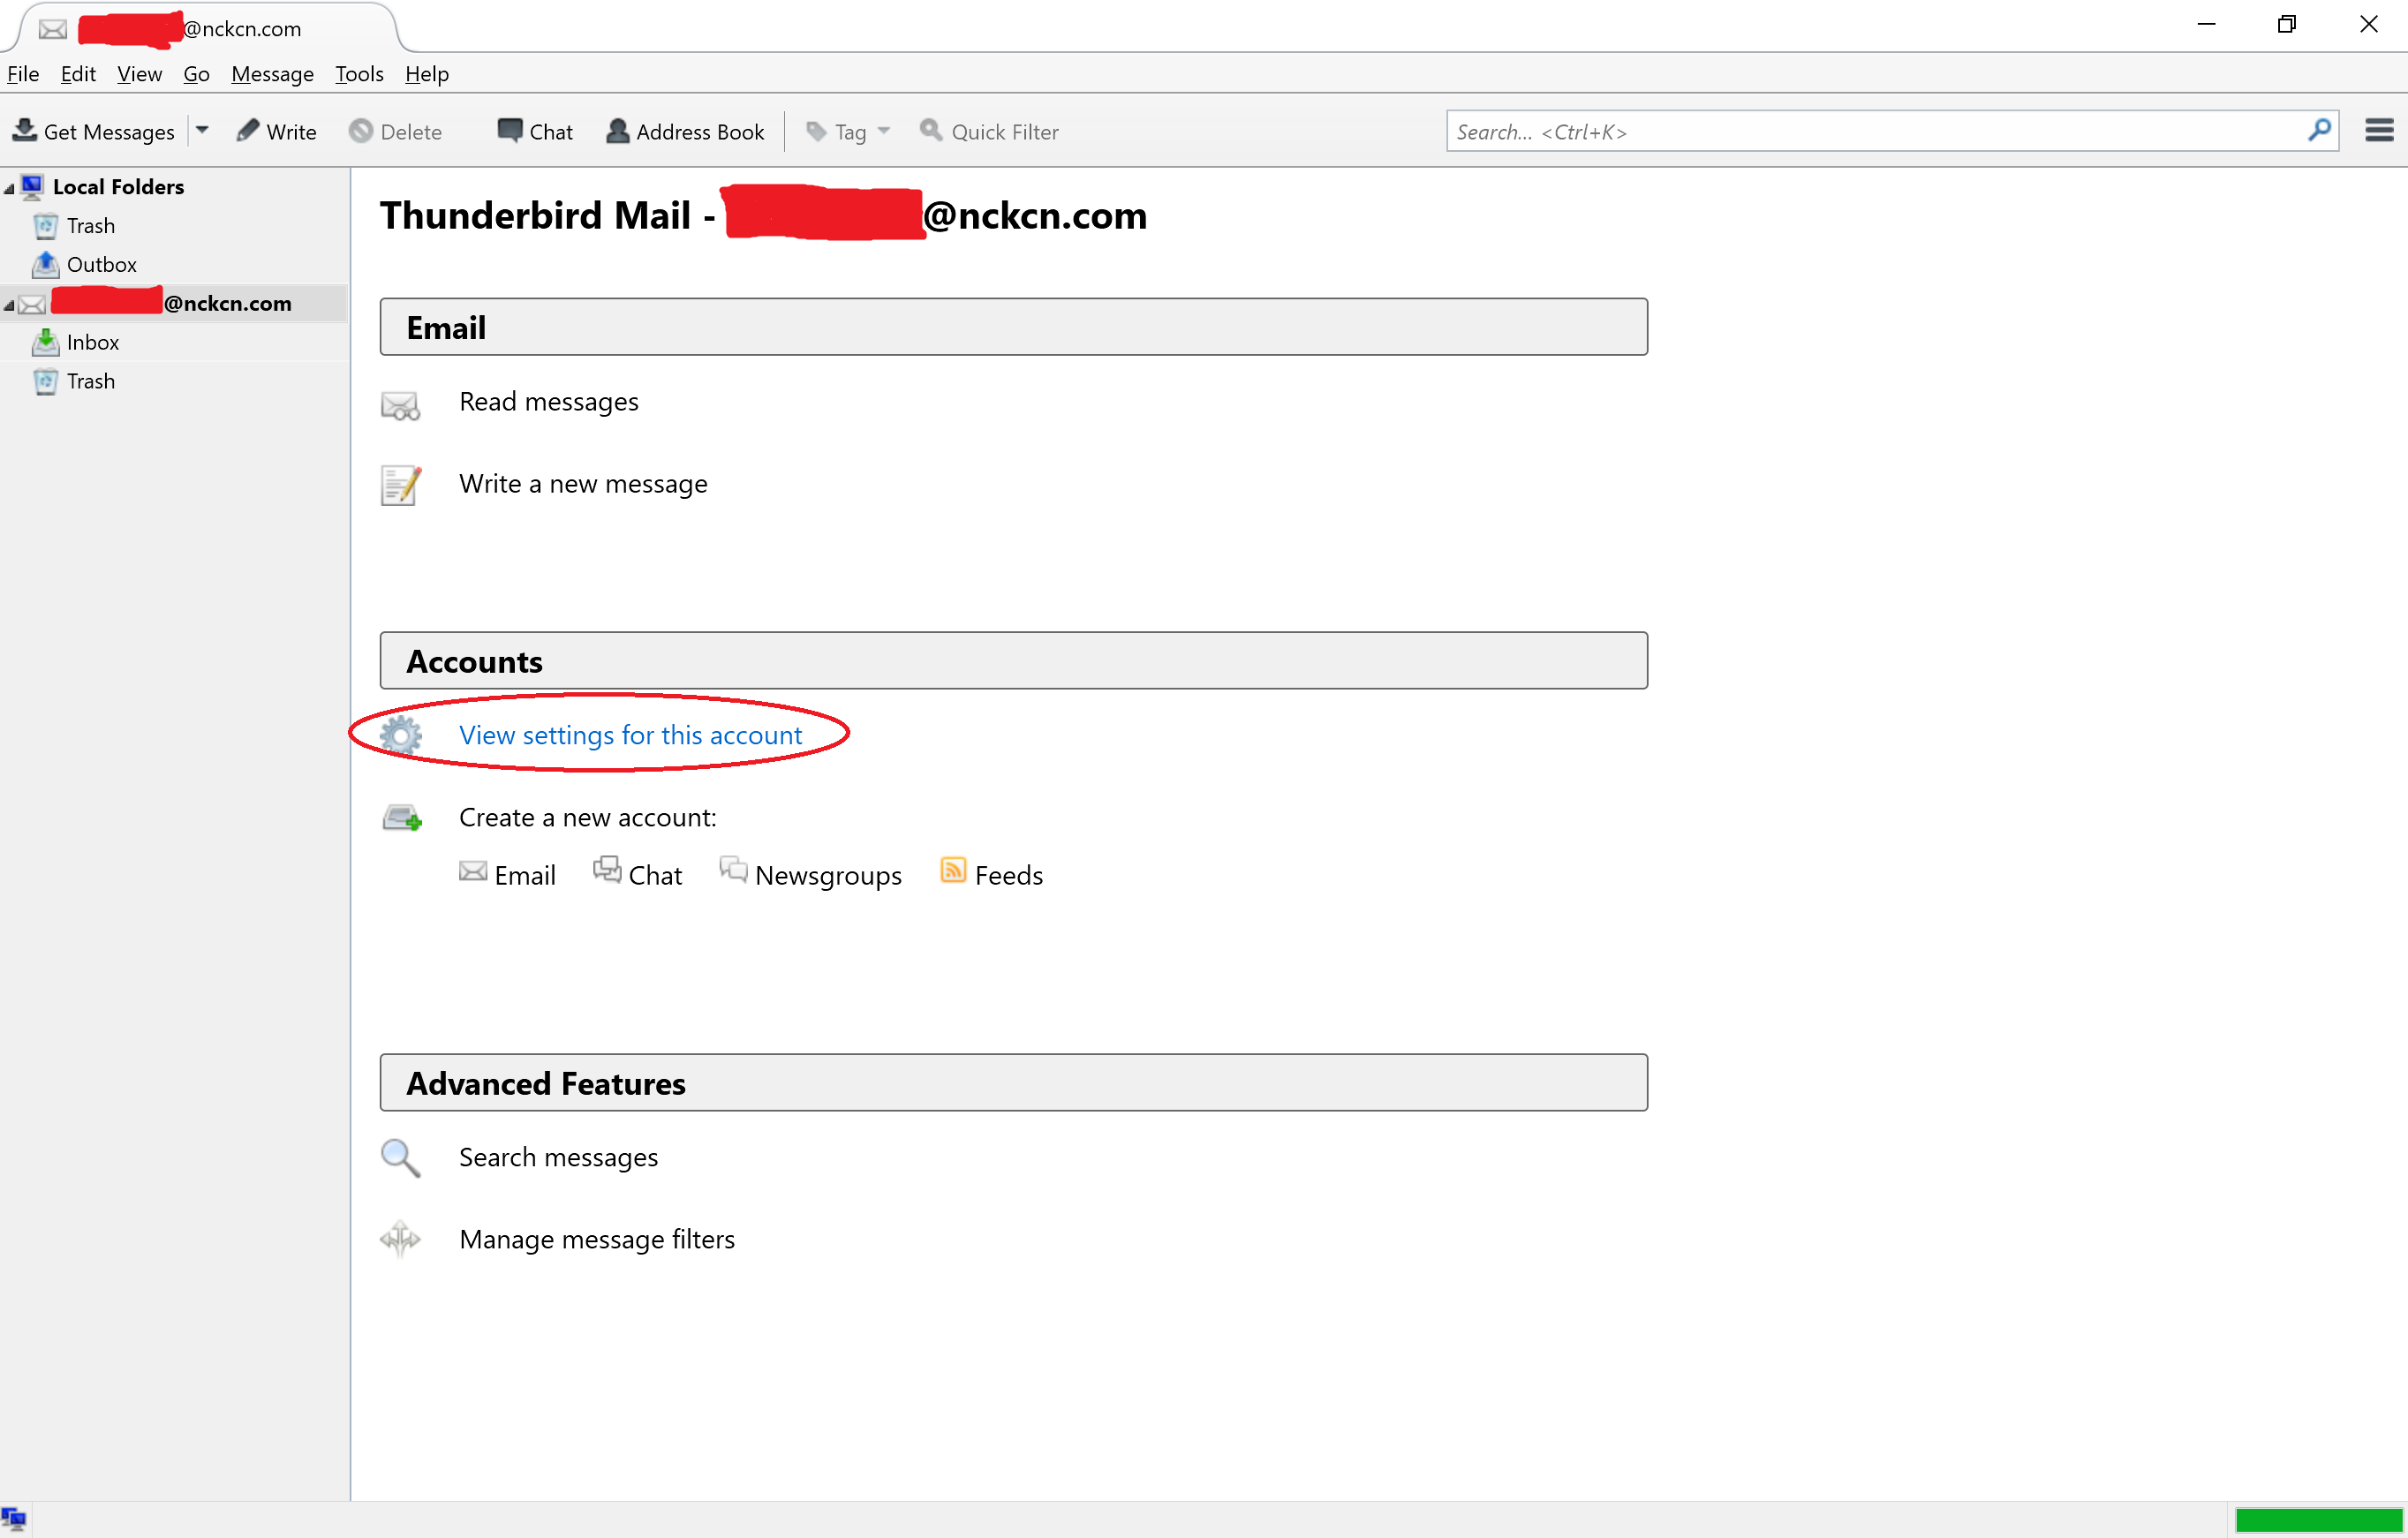
- To do this, click on your email address name located on the left-hand side, then click “View settings for this account“.
- Under “Server Settings“, locate and un-check the box for “Leave messages on server” and then click “OK“.

- Click “Email” under “Create a new account:“.
==========
Mail app
- Open the Mail app
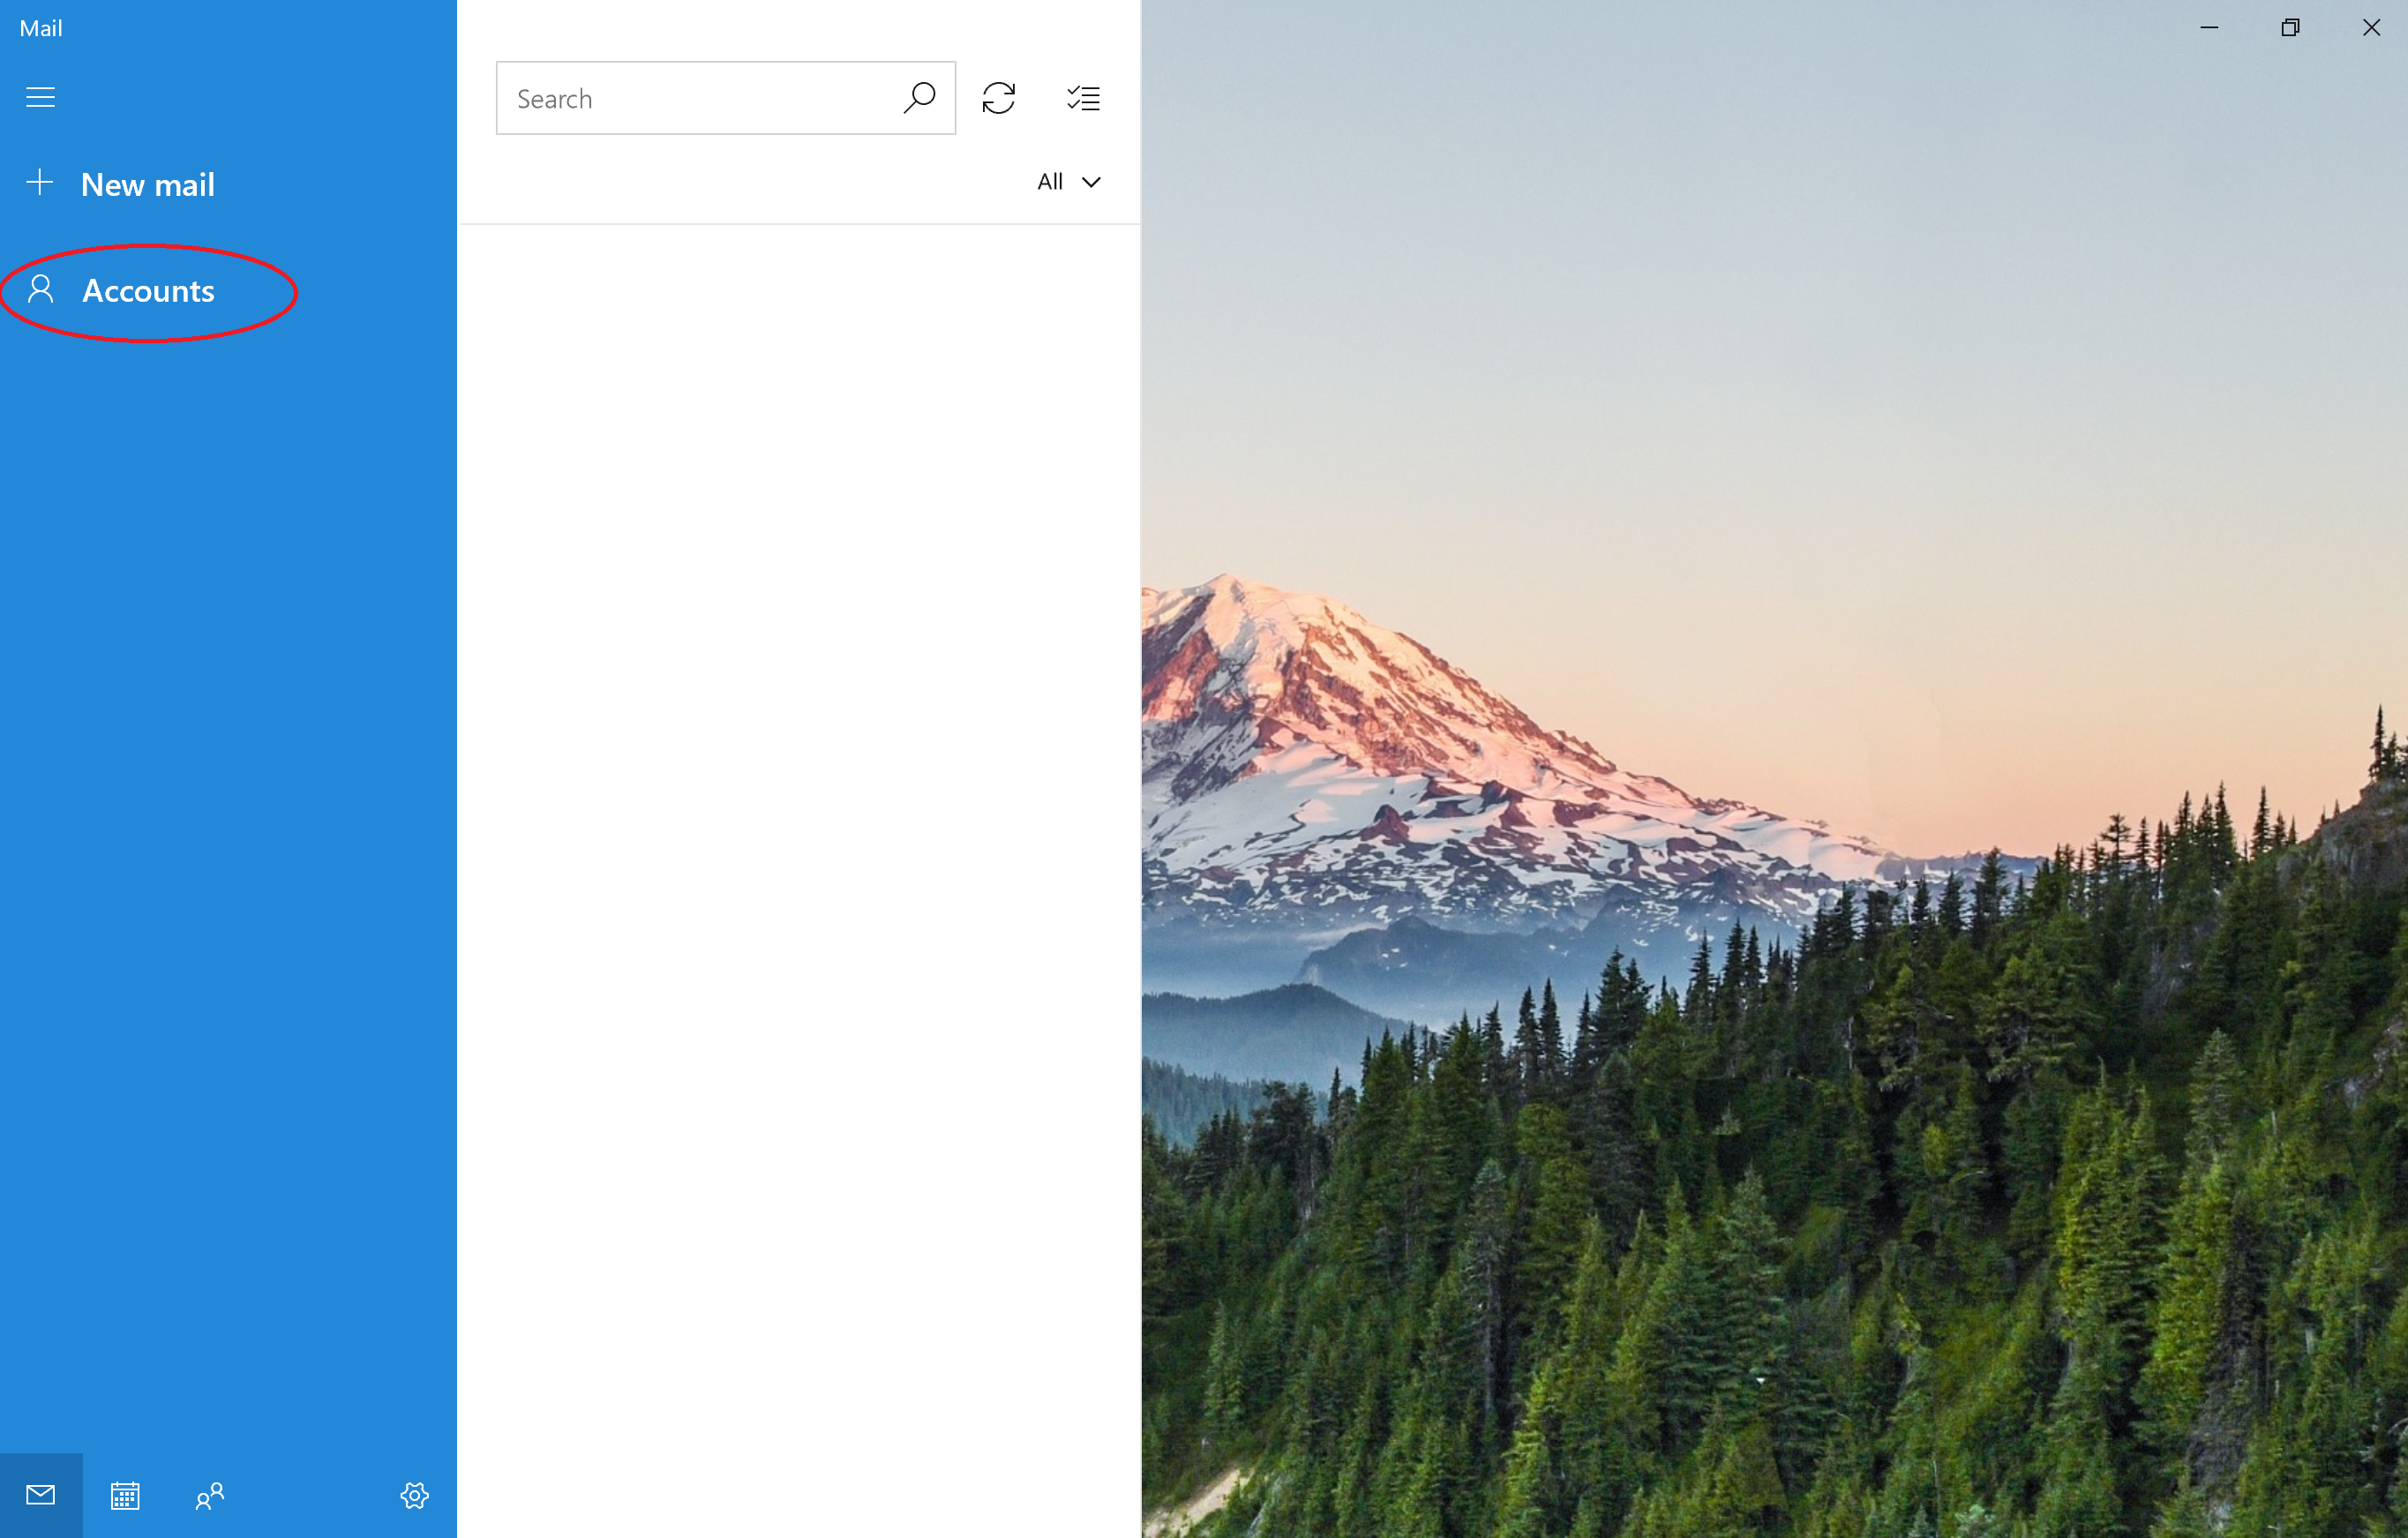
- Click “Accounts“.
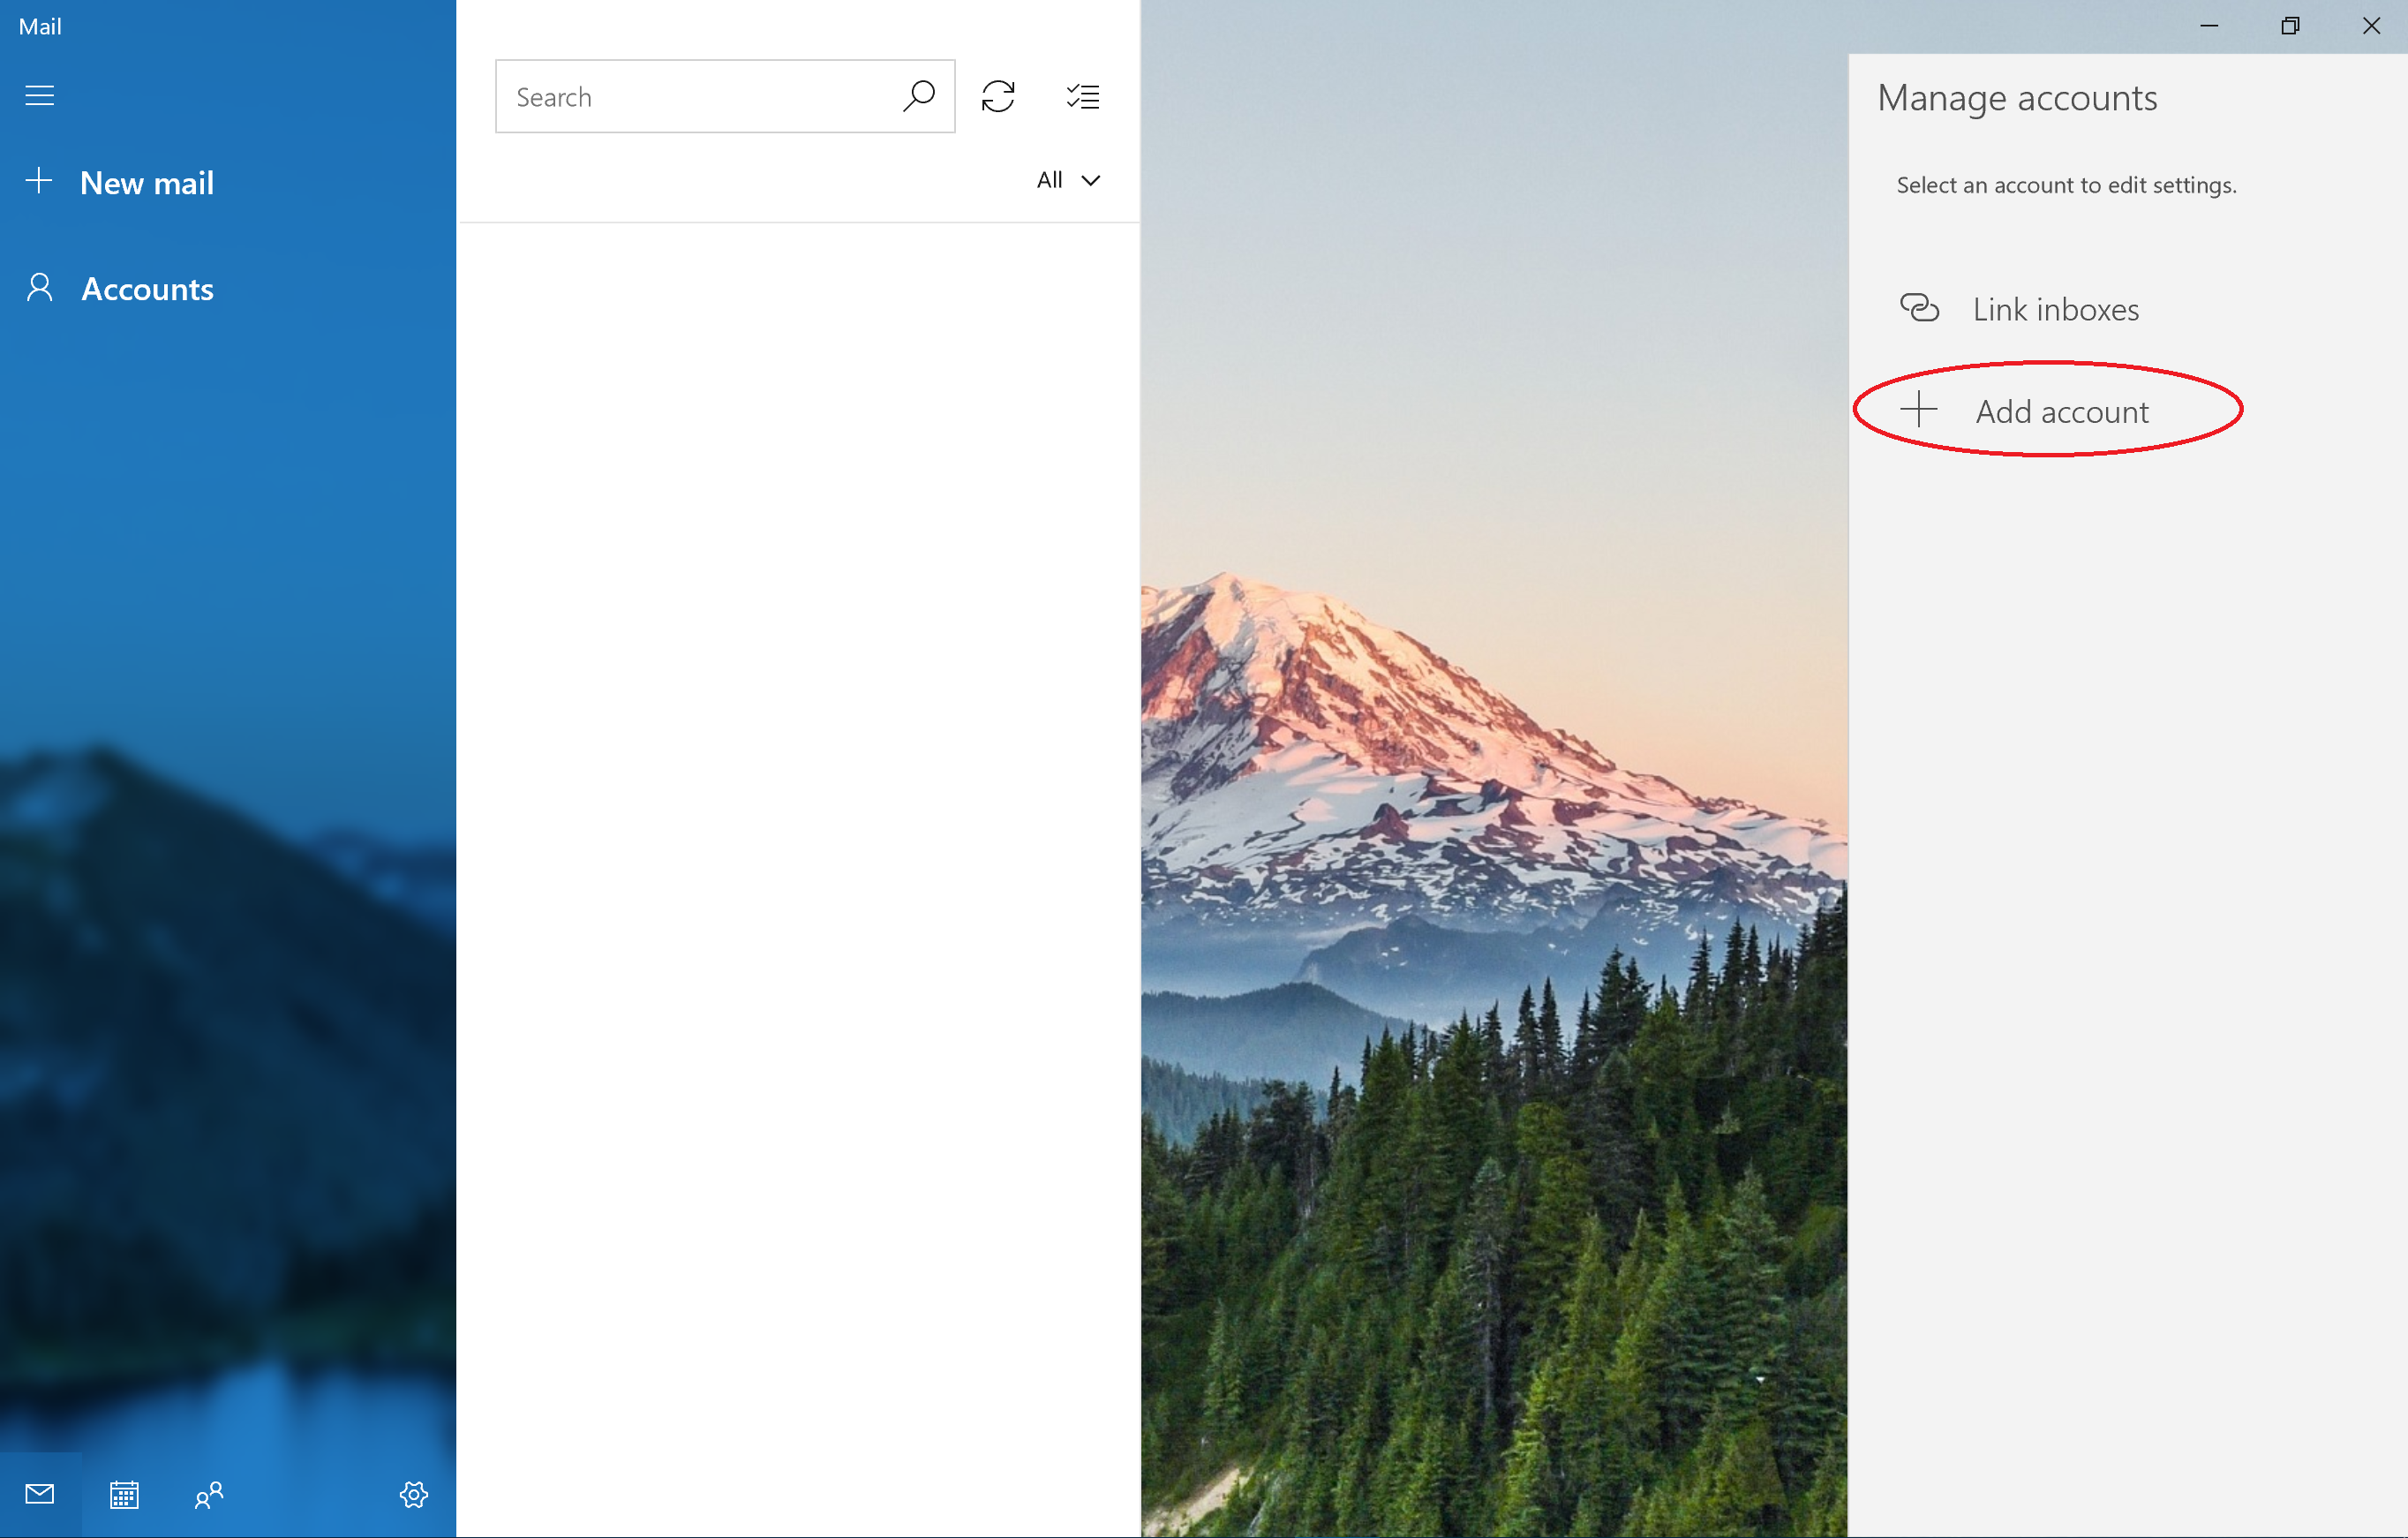
- Click “Add account“.
- Scroll to the bottom and Click “Advanced setup“.

- Click “Internet email“.

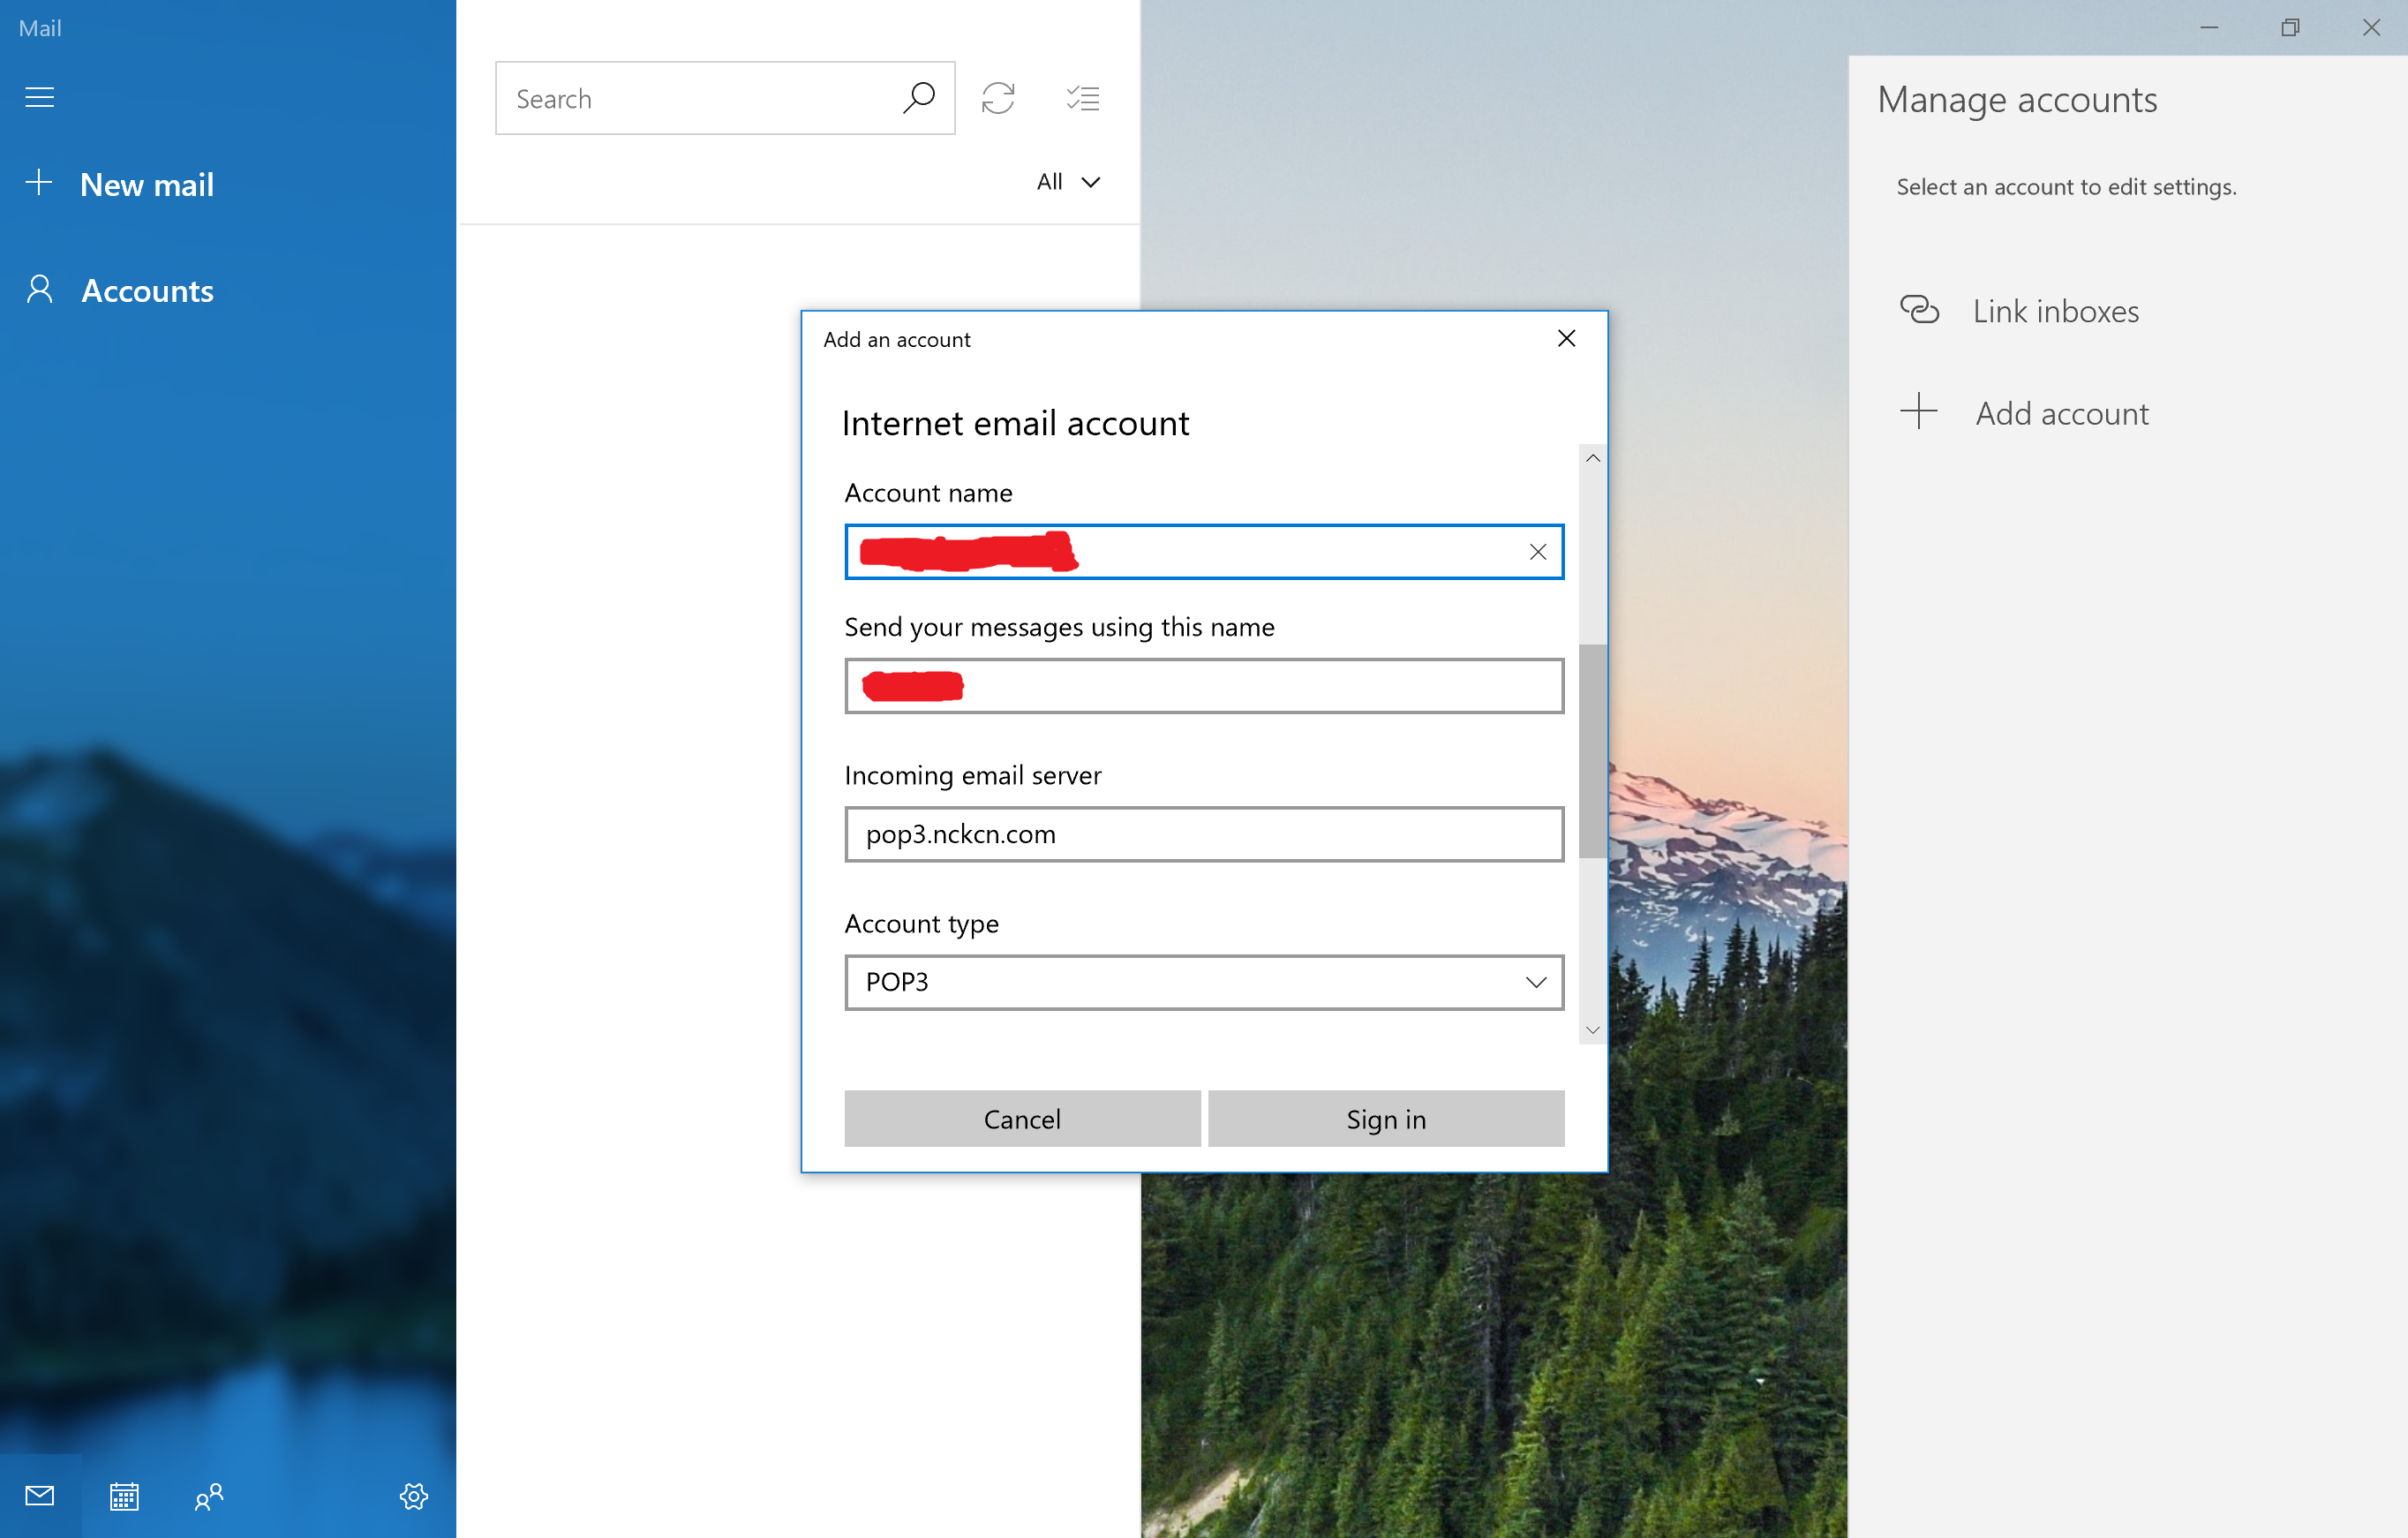
- Begin filling in your NCKCN email account information. The next 3 images below are all part of the same, you will need to scroll down to fill in additional settings. These settings include: Email address, User name, Password, Account name, Send your messages using this name, Incoming email server, Account type, Outgoing (SMTP) email server, and ensure the following boxes are un-checked: Outgoing server requires authentication, Require SSL for incoming email, Require SSL for outgoing email.


- Click “Sign in“.

- Click “Done“. You can now begin using the default “Mail” app that comes with Windows 10 to send/receive emails with your NCKCN email account. Wooooot Wooooot!
- Click “Accounts“.
==========
We hope you found some value reading this online guide provided to you by NCKCN.
If you could spare a few more seconds, we’d appreciate it if you could rate this article. Doing so will help us better understand our community as well as to provide better content for future articles.
We value your input and Thanks in advance!
 (4 votes, average: 5.00 out of 5)
![]() Loading...
Loading...
NCKCN's Assistant Systems Administrator / IT Plant Manager
Michael Draemel is the Assistant Systems Administrator / IT Plant Manager for NCKCN. For more information about Michael, visit: Michael's Profile page.